FAMILY VALENTINE MAILBOXES

Celebrate Valentine’s Day in your house by sending each other postcards! Kids will love getting mail especially in their own decorated mailbox. A fun family activity for all ages. Ages 2+.
Let the family fun begin- follow the simple steps below.
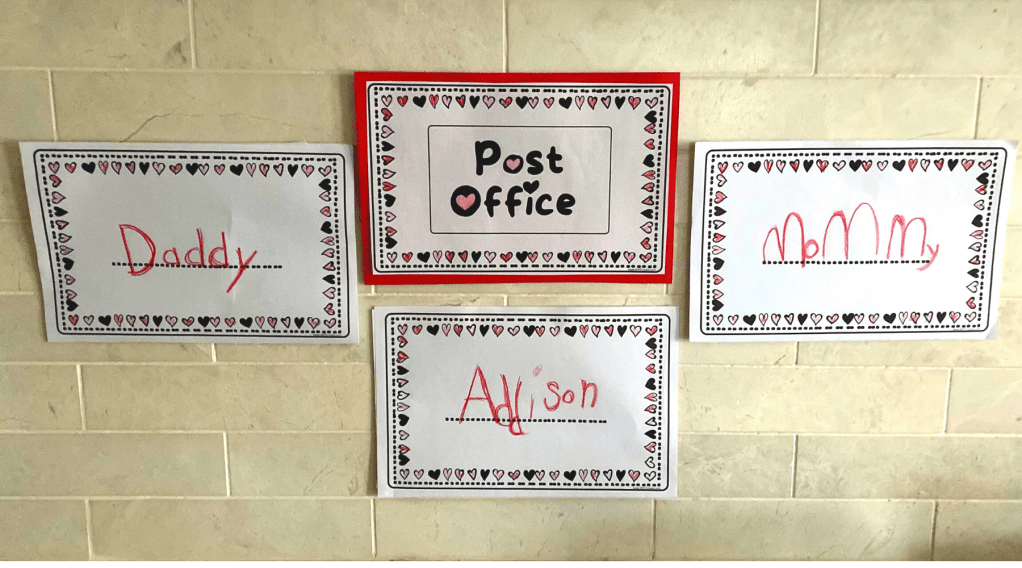
This activity can be done two different ways. The first option we did last year, it was all made out of paper with a Post Office station.We used envelopes for mailboxes (see picture above). This year we are using mini metal mailboxes, instead of the paper envelopes. Either way works- just depends on what supplies you have or look you like.
Materials:
- mini mailboxes or paper template (see below buying suggestions)
- white cardstock
- printer
- scissors
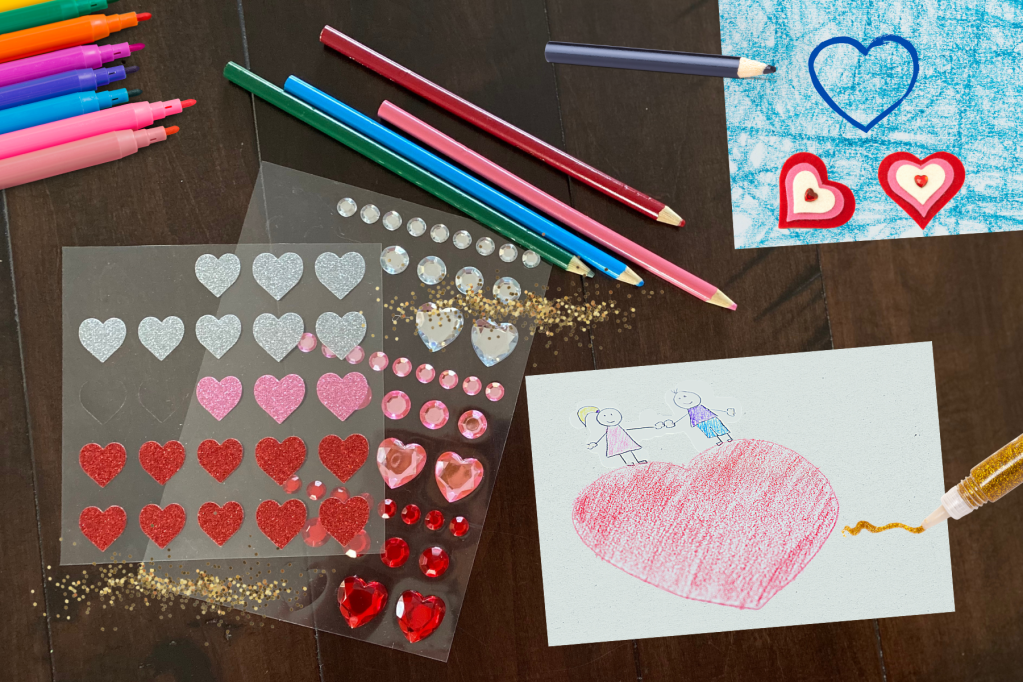
- markers/colored pencils/crayons
- Valentine Postcards
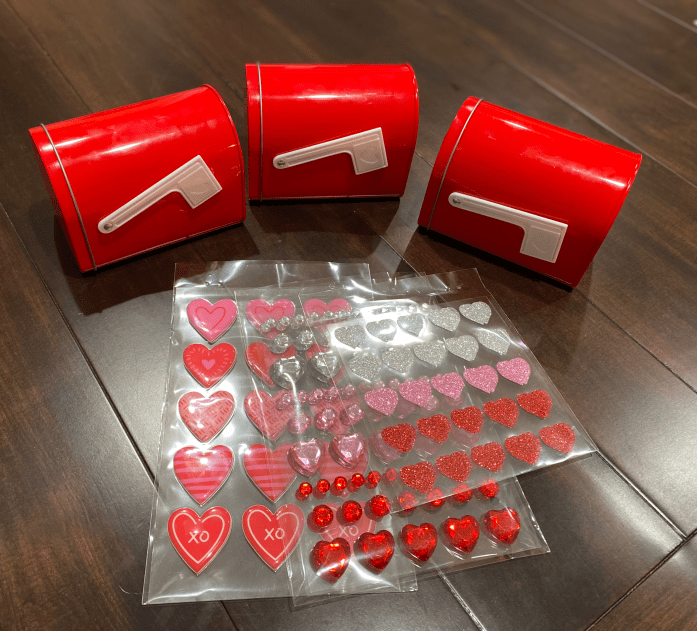
To decorate mailboxes & postcards: stamps, stickers, foam hearts, glitter glue
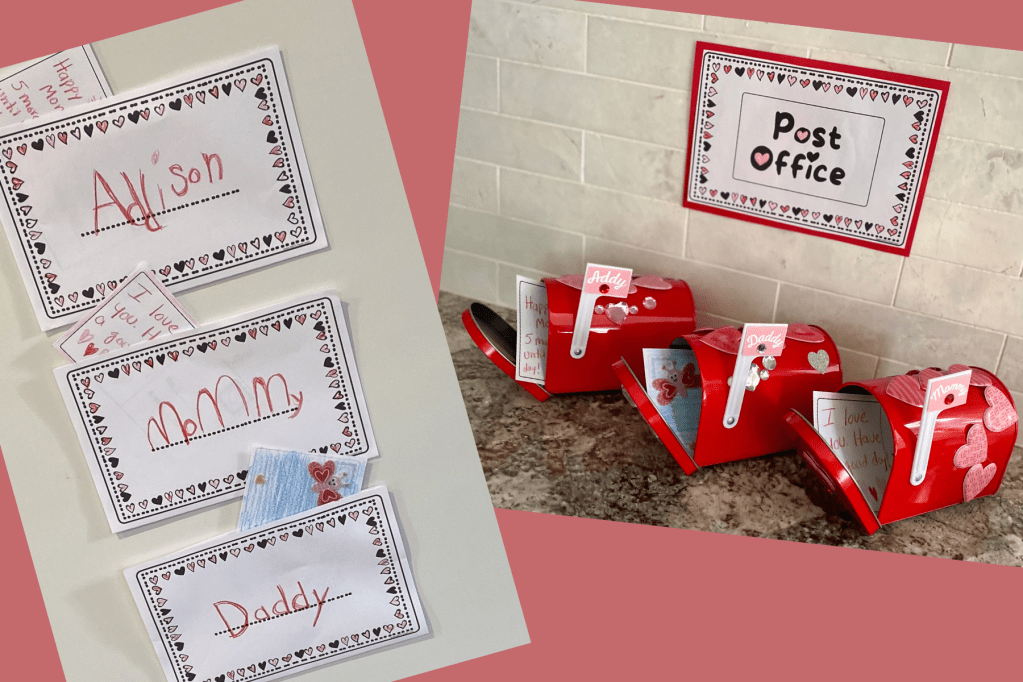
Mailboxes:
Choose which format you are going to use, purchase or print templates. Then add each person’s name on it and decorate.
I found ours at target, there were a few options at Dollartree with designs on. Amazon has these cute Ladybug mailbox craft kit. Oriental trading has these red tin mailboxes. Any craft store or dollar store should have them in stock.
You could also use a cardbox as well.

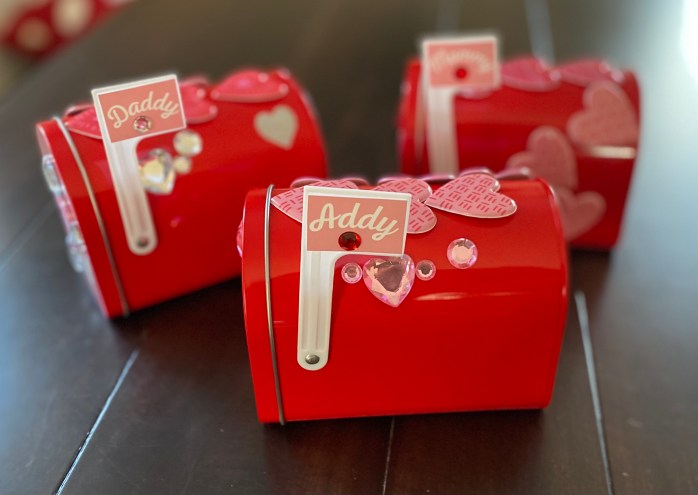
Example fo metal mailboxes decorated with stickers:
Postcards:
Print out the templates. Use only the templates you need. We printed out several pages and kept them in a basket for easy access. You could also make a small envelope to store them in and hang up.
*There are multiple sizes of postcards to fit different boxes or envelope sizes. Two options as well- one with lines and one without. The postcards with lines are for older kids who want to write a message.
Create a postcard each day or create a few and then place in mailbox over a few days. This can be a kids only activity or for even more fun- a whole family activity. If you have visitors, have them create postcards or send them the link for the postcard template. Any mail your child/children will love!
Decorate:
On the front of the Postcards draw a picture, use stickers, stamps, print out a picture (color, then attach), or attach a photo. Options are endless to decorate.
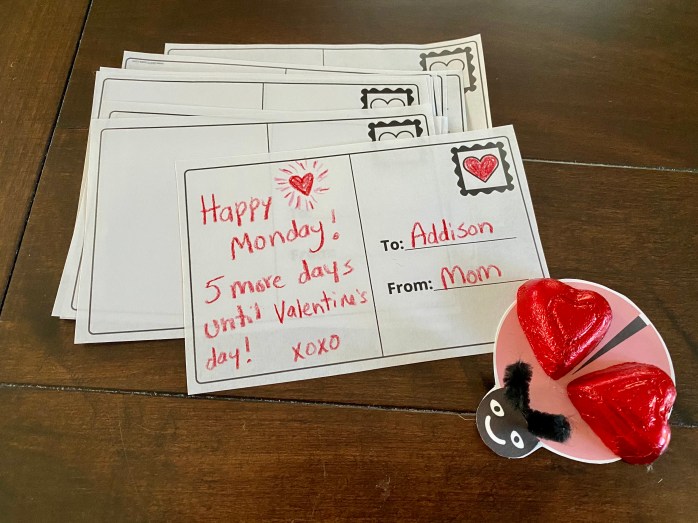
On the back right side– address who the postcard is for (to and from). Names are on the mailboxes, so if your child/children don’t know the spelling, they can copy off the mailbox. Or an adult can write if the child isn’t old enough yet.
Messages:
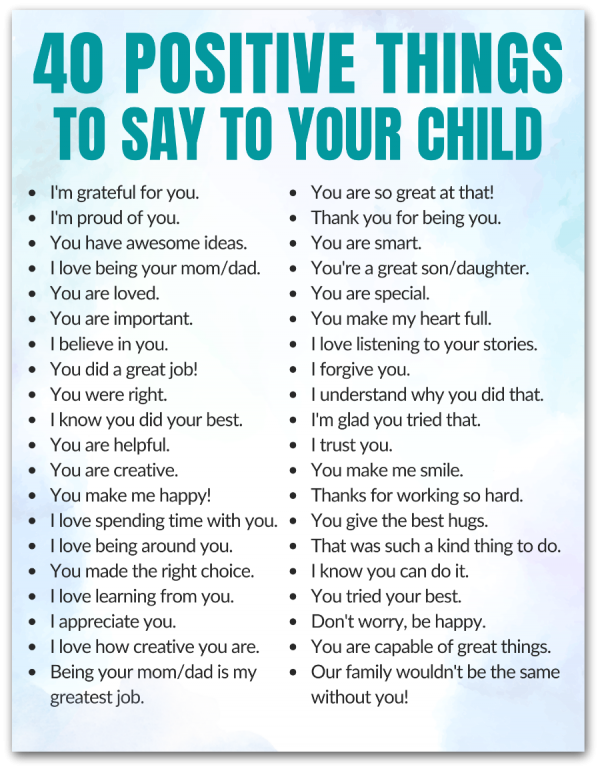
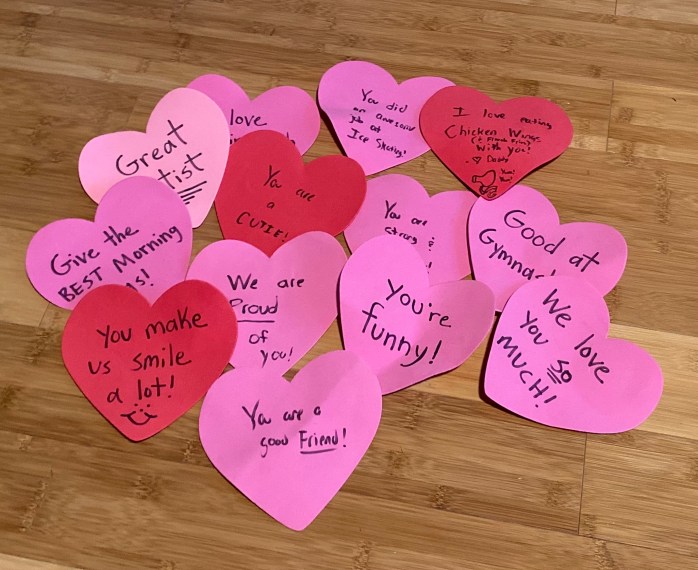
On the back left side, if the child/children are old enough, have them write a message, if not draw another picture. Here is a list of some suggestions for messages on postcards for your kids. Click on the image to make bigger in a new window.
Check for mail!
Checking for mail everyday was my daughters favorite part. You could also add small treats in the mailboxes along with the postcards.
You’ve got mail! Happy creating & receiving!
- MAT Create is a participant in the Amazon Services LLC Associates Program, an affiliate advertising program designed to provide a means for MATCreate to earn small fees at no cost to you by linking Amazon.com and affiliated sites. The small fees are then used for supplies to make more posts.
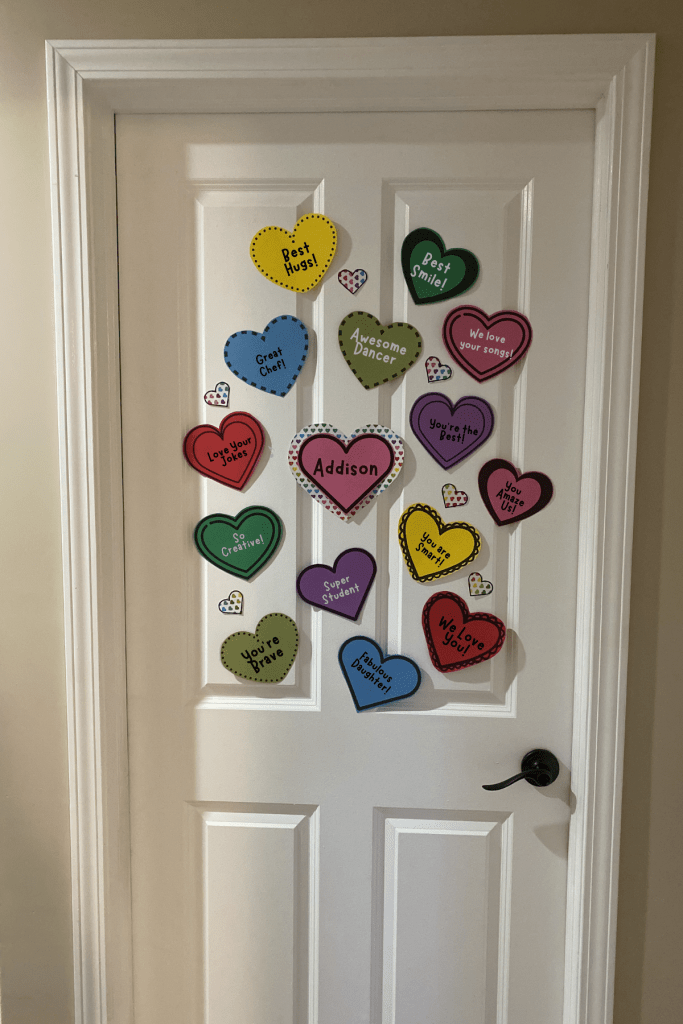
14 HEARTS OF LOVE

Celebrate Valentine’s Day by showing your child how much they mean to you. Starting on February 1st until the 14th place a heart on their door after they’ve gone to bed. When they wake up each day, a new heart will be waiting for them.
In this crazy world its nice to stop for a second and give your child/children 14 compliments of what makes them so special to you. This activity is great for confidence building too.
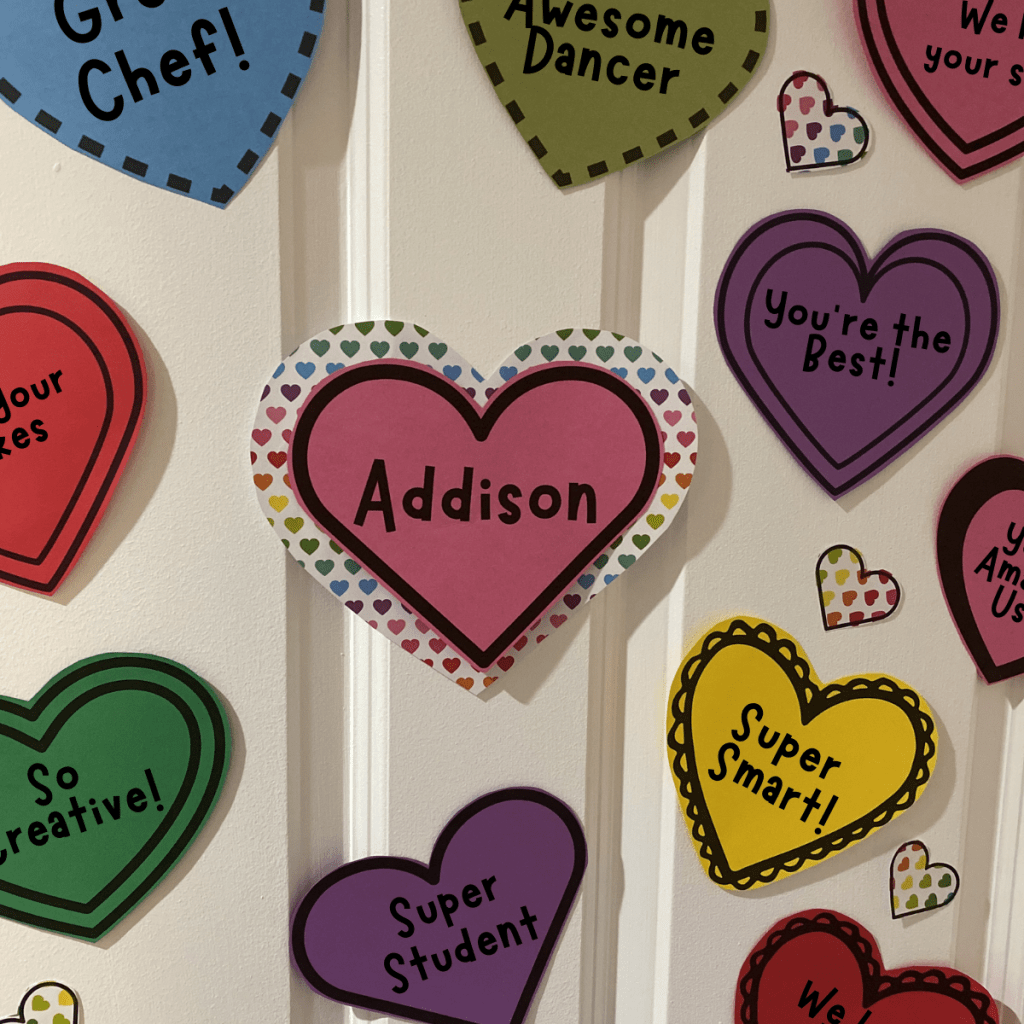
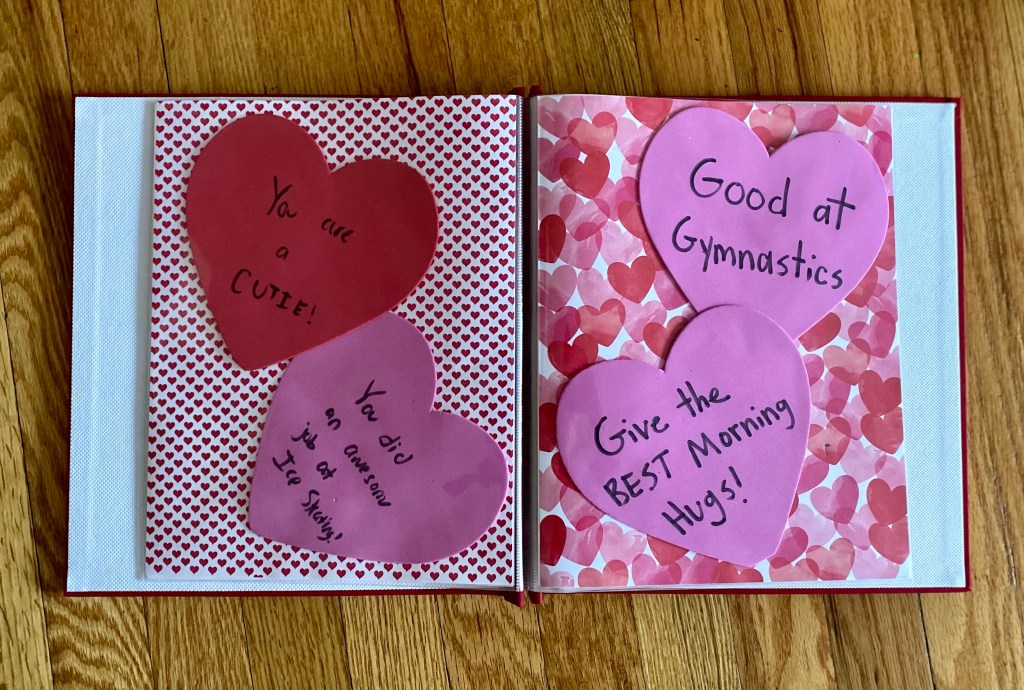
My daughter loved her hearts so much last year, she saved them. We put them into a photo album with the year. When she is having a tough day, we pull out the book. We are planning on adding 14 hearts each year, as long as we do it. By the end she’ll have a nice keepsake to look back on.
This year my daughter has requested to make hearts for our bedroom door too. I’ll work with her to make hearts to put on my husbands office door and my husband will work with her to make hearts for me on our bedroom door. It can be a whole family activity! For larger families, take turns placing hearts on each other’s doors. Divide the family member total by 14, if not even, parents can complete more hearts.
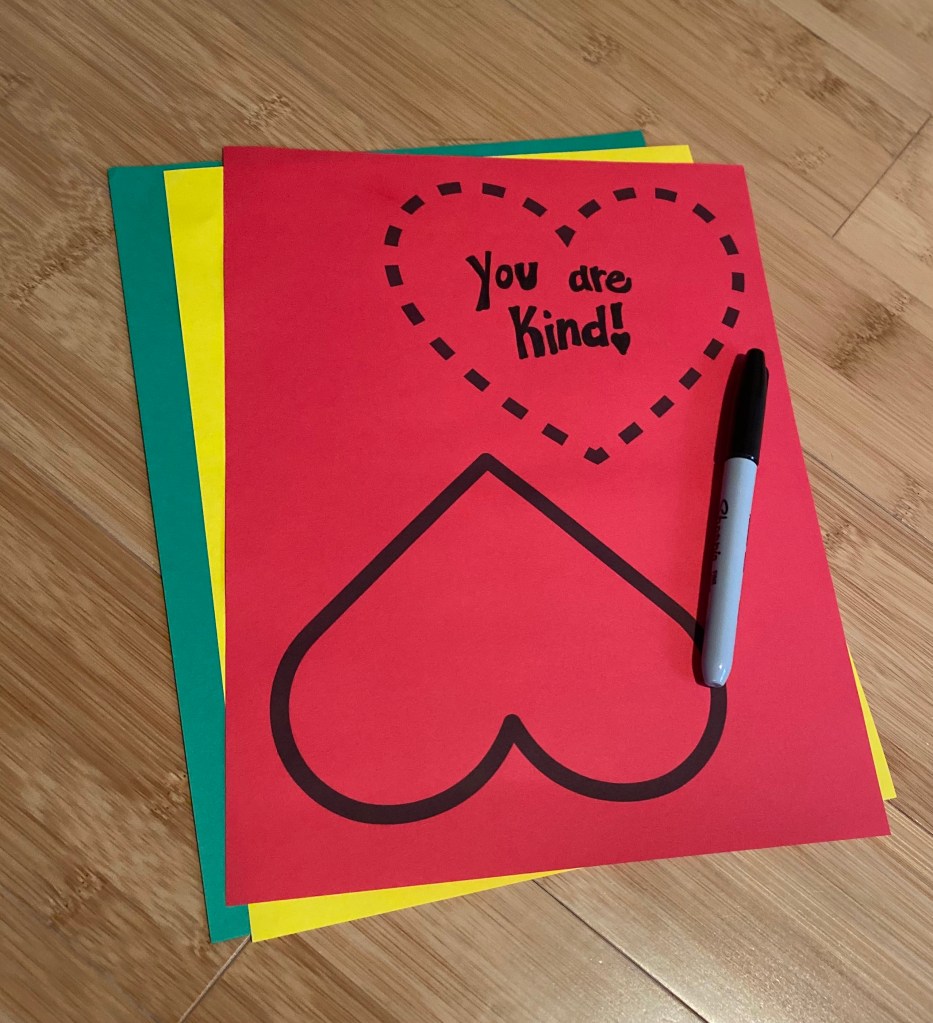
Note: There are 2 options to make the hearts. You can open in Canva and type in your messages or you can hand write your messages. Both options come with the Etsy listing.
Materials:
- 14 Days of Love templates
- color cardstock or color paper
- printer- black ink only
- scissors
- marker or markers (to write messages)
- tape or tack (to hang)
To make:
1.) Print out the templates. *Mini hearts are for optional decoration.
I wanted to add more color, so I bought scrapbook paper to use as the background on her name heart and for small decorative hearts. *If you know what you are going to put on all 14 hearts and prefer not to hand write, you can put your compliments on the templates before printing.
2.) Cut out templates.
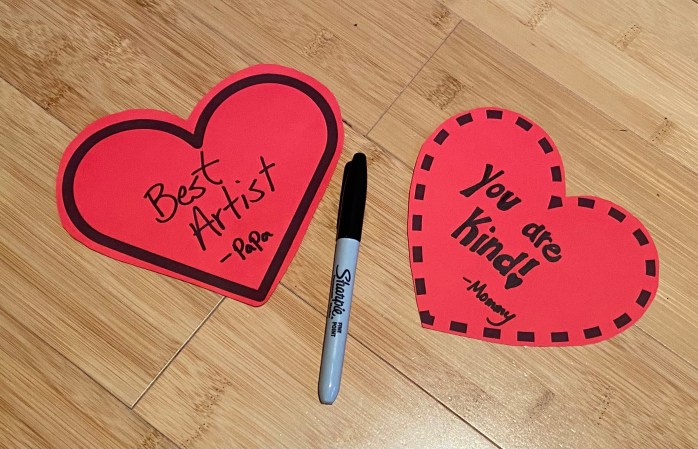
3.) Write messages on the hearts.
You can write the messages ahead of time or do it each day. If you want your messages to be about their day, wait until the night before to write their message.
There is no right or wrong thing to write. Since there are 14 different days to write messages on the hearts, in our house, my husband and I took turns completing them individually, and did some together. In larger families, siblings could get involved or any other family members.
This year we are going to have extended family get involved. All it takes is a quick phone call and I’ll write their messages on the hearts for them. I’m sure she’ll love guessing who is going to share a heart compliment with her each day.
Some examples for inspiration- 40 Positive Things To Say To Your Child , 66 Positive Things To Say.
4.) Before February 1st, place their name heart on the center of their door and tell them its for a surprise.
5.) February 1st-14th: Place one heart each night on your child’d door after they’ve gone to sleep.
- I put tack behind our hearts to avoid pulling paint off the door. If no tack, this tape won’t take off any paint.
- If multiple children in one bedroom, print hearts at smaller scale to fit 2 sets on a door. Or you could use another door in your house.
Notes: You can do this activity with any hearts. Last year I bought a pack of foam hearts and used those. Each year my plan is to make them a bit different, since saving them in a photo album.
Happy Creating & Complimenting!

- MAT Create is a participant in the Amazon Services LLC Associates Program, an affiliate advertising program designed to provide a means for MATCreate to earn small fees at no cost to you by linking Amazon.com and affiliated sites. The small fees are then used for supplies to make more posts.
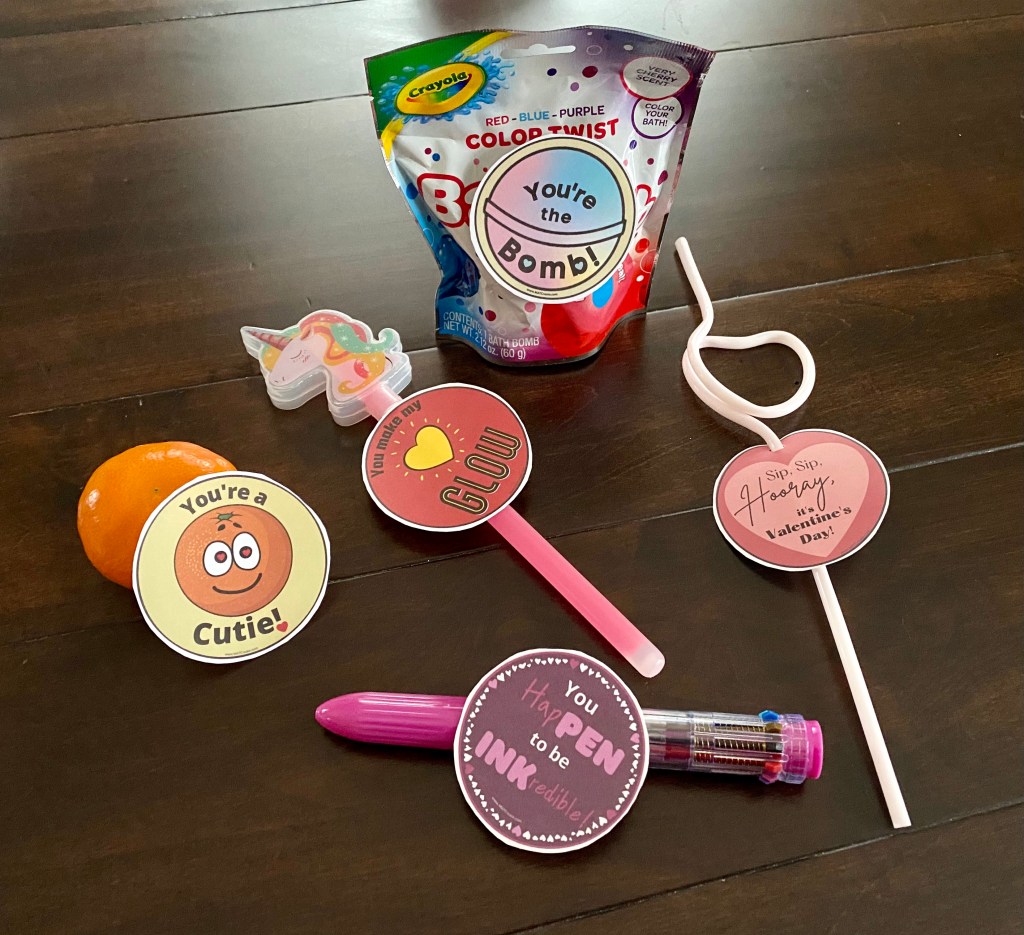
14 DAYS OF VALENTINES

Let the celebrating begin early for Valentine’s Day! Every day starting February 1st through 14th, surprise your child/children with a cute and creative treat! Something for them to look forward to on multiple days, instead of just celebrating only on Valentine’s Day.
Materials:
- 14 Days of Valentine templates
- white cardstock
- printer
- scissors
- tape
- items/surprises (see below or shopping list)
Go Shopping:
I found my items at multiple stores- Walmart, DollarTree, Rite Aid, and Target. You could easily find everything at a grocery store and the dollar store. You could also buy everything online too.
Suggested items to buy (on printable list too): donuts, watercolors, chapstick (I used this one, smores option), lollipop/Pop Rocks/ Ring Pop, squishy toy, Play Doh, bouncy ball, bath bomb, mandarin orange, heart pen, chalk, ball, Swedish Fish/Goldfish crackers, glow stick, applesauce, bubbles, straw, candy lips.
To Make:
Print out the templates. There are 18 templates, choose which 14 you want. Cut them out and then attach to each item with tape.


*You can wrap each item and place circle template on top. Or you could also hide each item everyday and then have your child/children hunt for them to make it more interactive.
Happy Gifting & Surprising!
Note: The 14 Days of Valentine Templates are an original design. The templates are for personal use only. By using them, you agree that you will not copy, or reproduce the templates, except for your personal use, noncommercial use. MATCreate is an affiliate of Amazon Associates.
SNAIL LOLLIPOP VALENTINE

Who doesn’t love snails, especially when they have a sweet treat as their shell. This easy to make Valentine is sure to be a hit! Happy Snailentines Day!
Materials:
- Snail Valentine template
- white cardstock
- scissors
- tape
- hole punch (optional)
- markers/crayons/colored pencils (to sign)
- lollipops
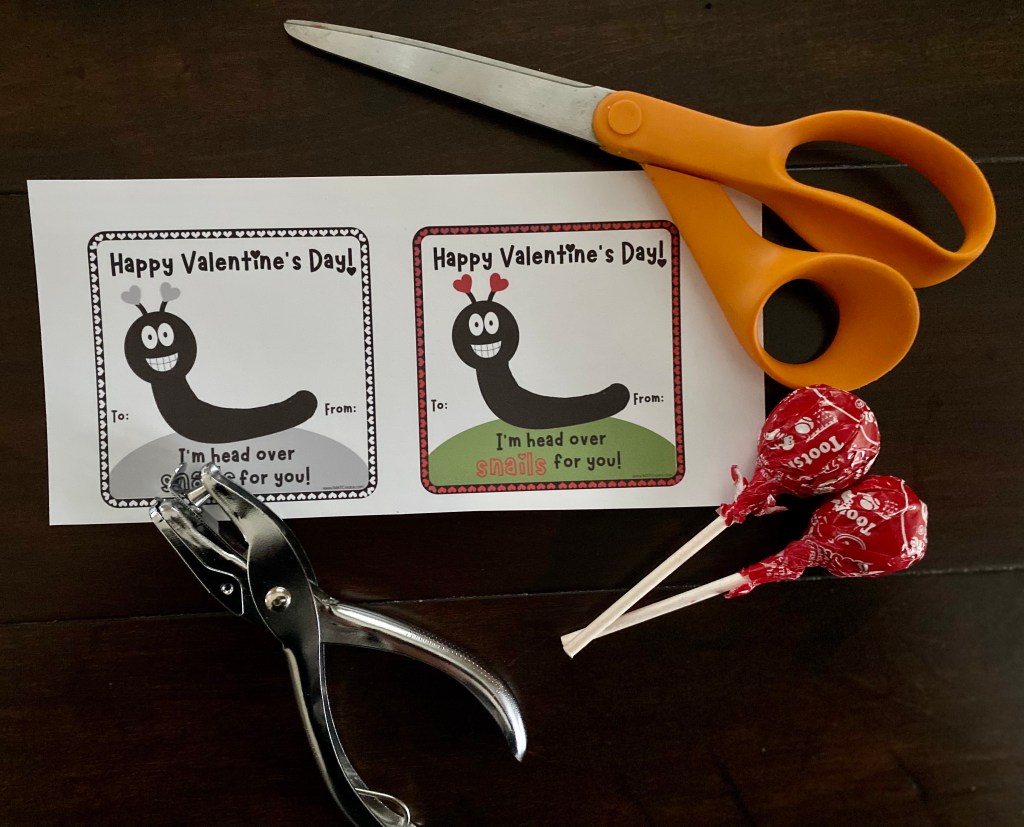
To make:
1.) Print template, then cut out.
2.) With a hole punch or scissors cut a small hole (for the stick) in the center of the snail (see picture). Then slide the lollipop stick through.
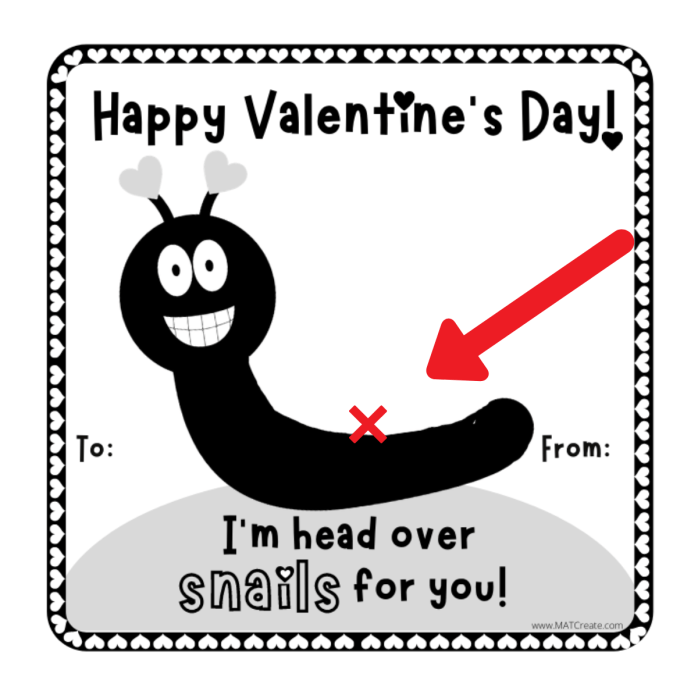
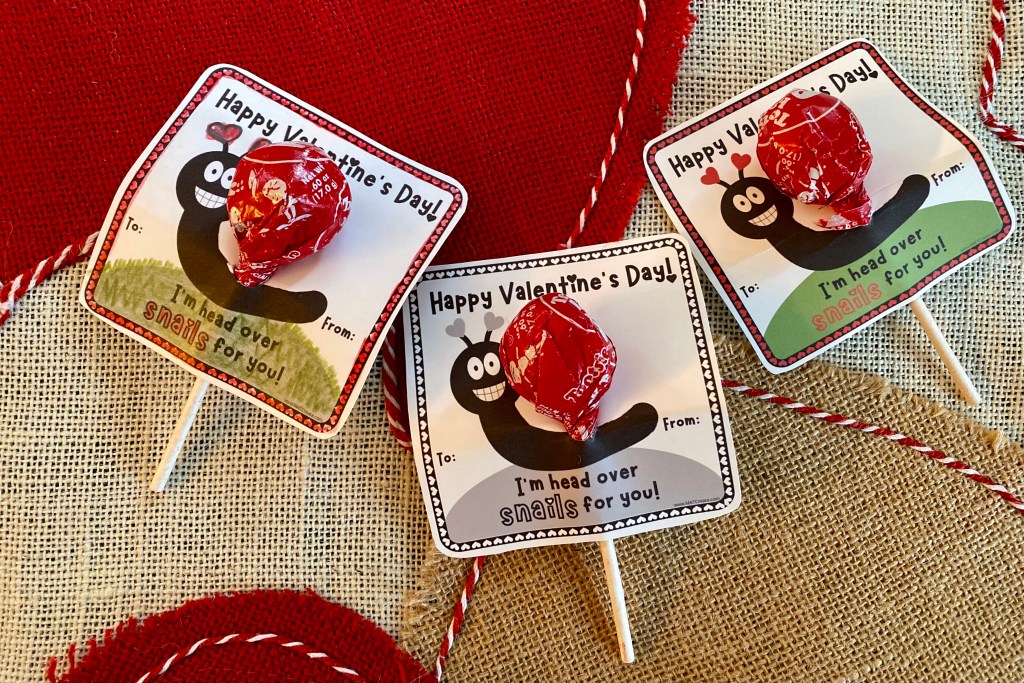
3.) Tape the stick to the back of the valentine to secure. Enjoy!
- Example of each (left): black/white with colored pencils, black & white, and color ink.
Happy Creating & Gifting!
Note: The Snail Valentine Templates are an original design. The templates are for personal or classroom use only. By using them, you agree that you will not copy, or reproduce the templates, except for your personal use, noncommercial use.

- MAT Create is a participant in the Amazon Services LLC Associates Program, an affiliate advertising program designed to provide a means for MATCreate to earn small fees at no cost to you by linking Amazon.com and affiliated sites. The small fees are then used for supplies to make more posts.
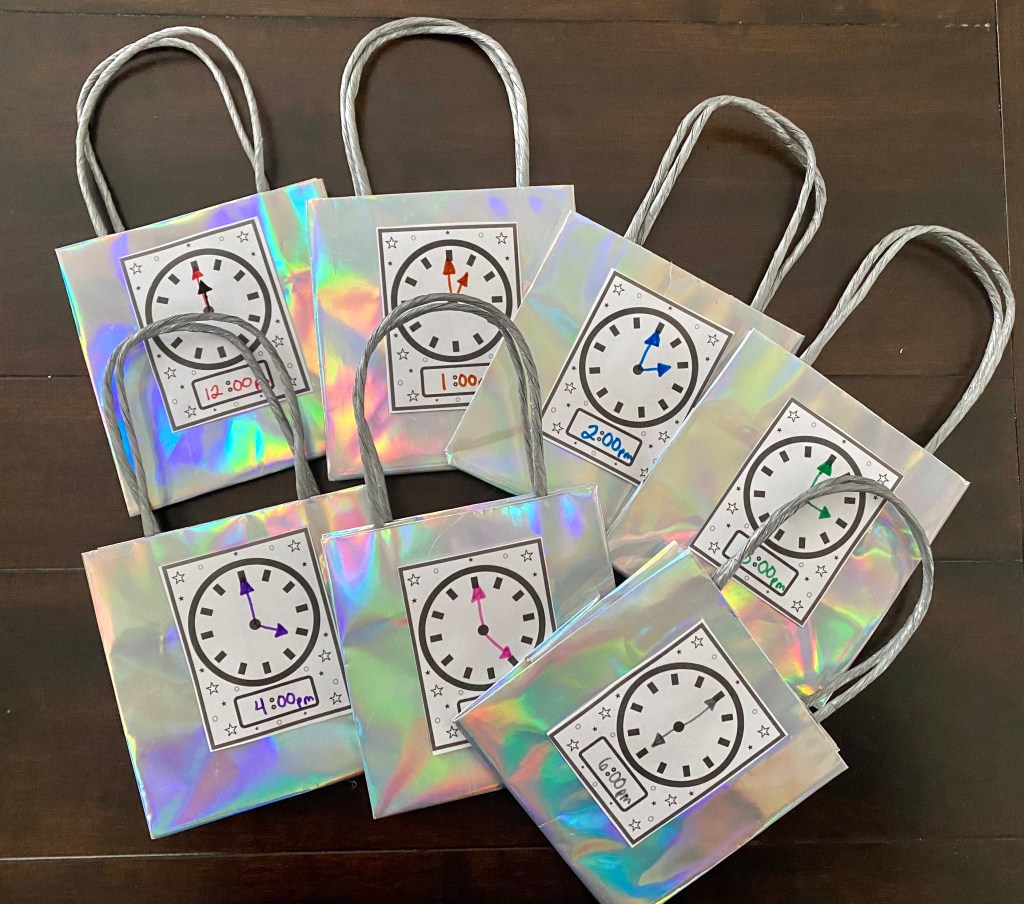
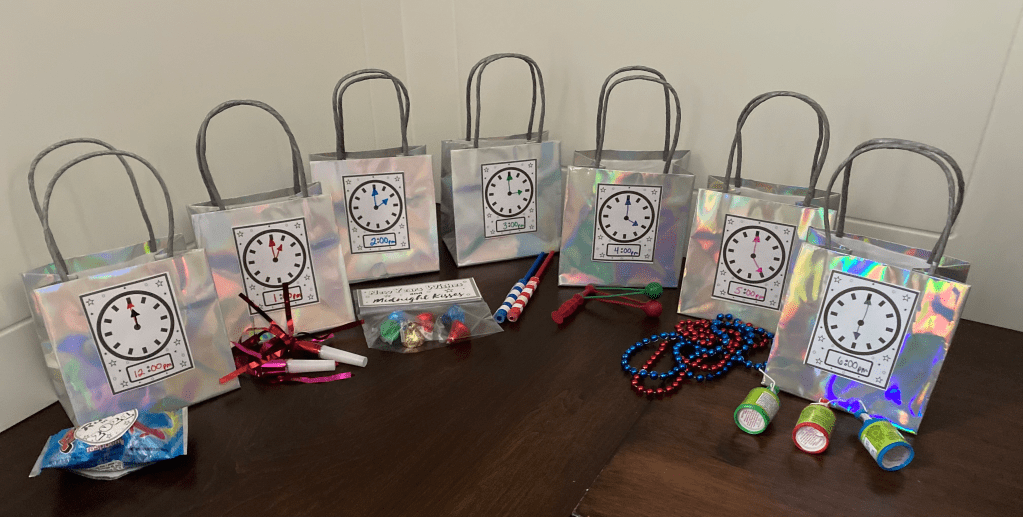
NEW YEARS COUNTDOWN

Ring in the New year with some family fun! Every hour open a special bag and by midnight (or 8pm) you’re ready to celebrate! I’ve updated the templates to 2022!
Make as many bags as you want, just simply add the time on them. For earlier bedtimes, have the countdown end sooner. In our house we are going to start at noon and then open our last bag at 6pm, then the party begins and can still make bedtime in time. Add extra fun and hide the bags. Each hour tell child/children what number bag to find.

Materials:
- Templates
- white cardstock /printer
- crayons/markers/watercolors
- mini paper bags (one per hour, choose how many hours you want to do)
- tape or glue
- bag fillers- noise makers, mini clacker noise makers, blow horns, blower whistles, (see more options below)
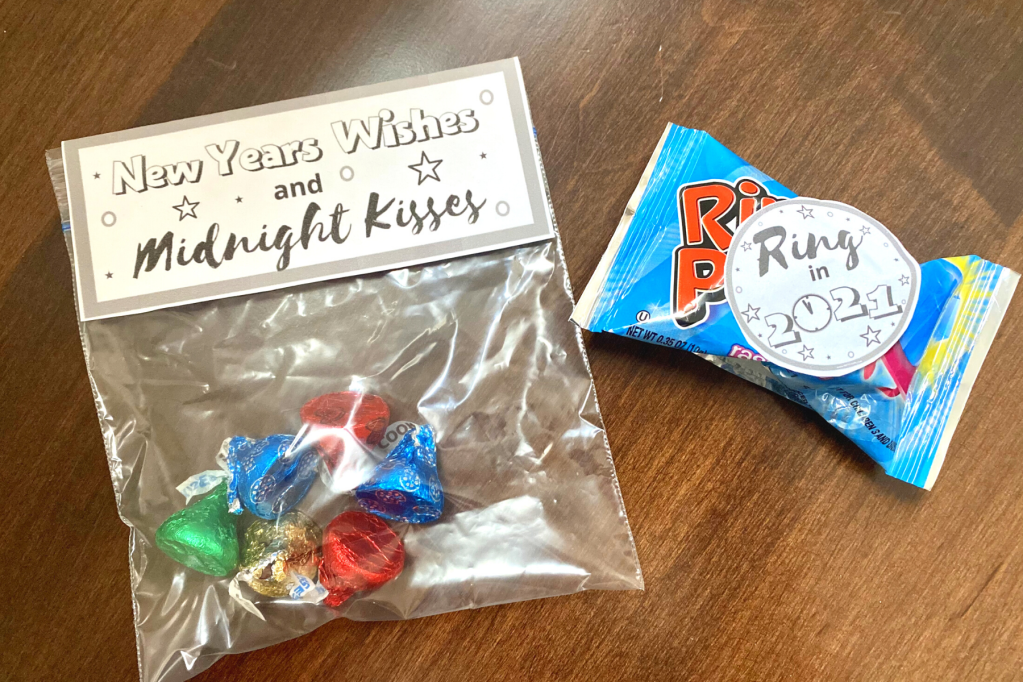
- Ring Pops
- clear bags (could also use fold top sandwich bags, fold sides in at top to fit).
- stapler
- Hershey Kisses
Ahead of time:
1- Party Hats: Print out the party hats. Template is kid sized (around), add additional strips for adults. Print in a smaller scale to fit pets and stuffed animals (more hats = bigger the party). Also, print out the New Years Resolution Handout (ages 3+).
2- Countdown Bags- Print out clocks, cut out, and attach to bags. Write the time on each bag and fill in the analog clock. If more than one child, share the bags, but make individual treats for each child inside.
3– Ring in the New Year: Print out the label and attach to a ring pop with tape. Then place in a bag.
4- New Years Wishes & Midnight Kisses– Print out label, cut out, and fold in half. Place Hershey Kisses in a small bag and then attach label to top (staple or tape). When child opens bag, have them write their New Years Wish on back of template & cut template in half to save that part.
5- Fill Bags: place the rest of surprises in the bags. Staple or tape to close.
6- Hide bags day of New Years Eve.
Let the fun begin!
Give your child/children the party hats to color and have them find or give bag #1. After they find/open bag #2, have them fill out the New Years Resolution Handout. Then every hour continue to give or find a bag. Once all of the bags are given- time to party with all of the surprises! Enjoy.
Other bag filler ideas:
silly string, candy, Pop Rocks, cotton candy, Rock Candy, fruit snacks, cupcake, packaged cookies, poppers, small bubbles, party poppers
Recipe Cards to put inside bags (then make)- Mocktails, cupcakes, confetti clock cookies, Hershey Kiss Cookies, star sugar cookies, pretzel stick sparklers, New Years giant pretzel.
Notes:
- I printed the “Ring in the New Year” circle template on label/sticker sheet, then cut out- to make into a sticker.
- Make a big Happy New Year sign- on poster board, attach cardstock or ink jet paper together to create a banner.
- If no time to shop online or want to go in person- I got most of my supplies at Walmart & Dollar Tree (look in party section). Party City should have lots of great bag fillers too.
Happy Reflecting on 2025 & Celebrating 2026!

NEW YEARS RESOLUTION STARS

Happy New Year! Time to make your New Year’s resolutions. Simply print out the document below. As a family or individually fill in each star. You can fill out by writing words, pictures, or both inside the stars.
Put this sheet away and save until the end of 2022. Then, read and see if you met your resolutions. I always pack ours away with the Christmas decorations. That way I can easily find the next year.
Materials:
- white paper
- printer
- New Years Resolution Template
- markers/crayons/colored pencils
- magazines, printed out clip art/images (optional)
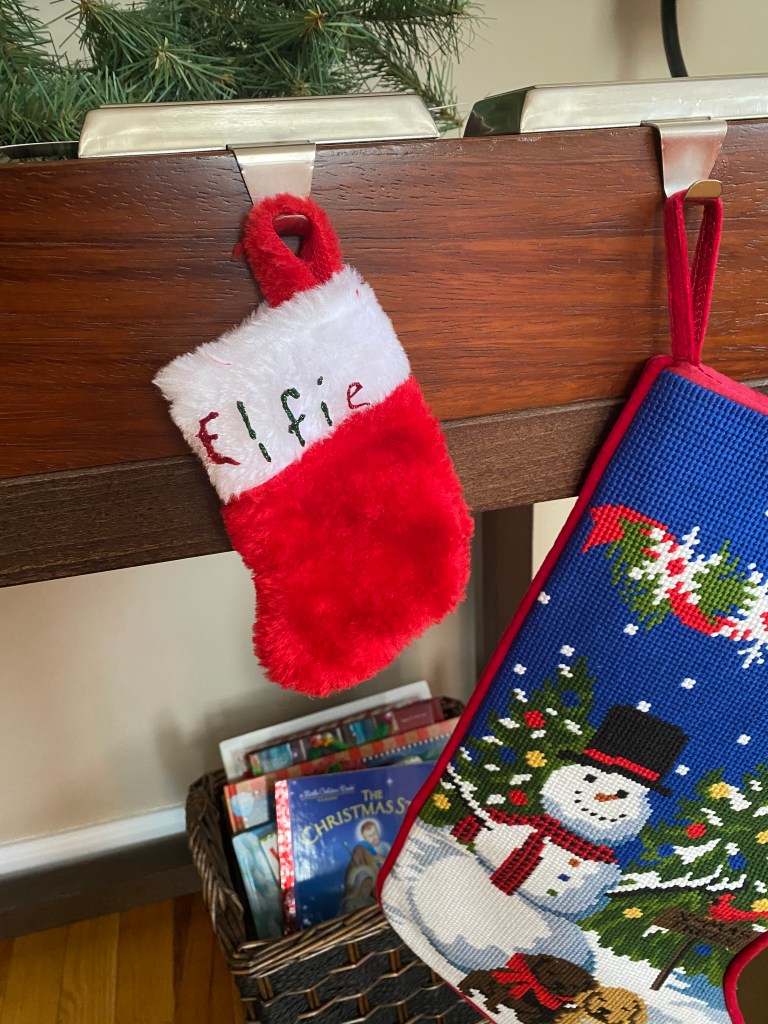
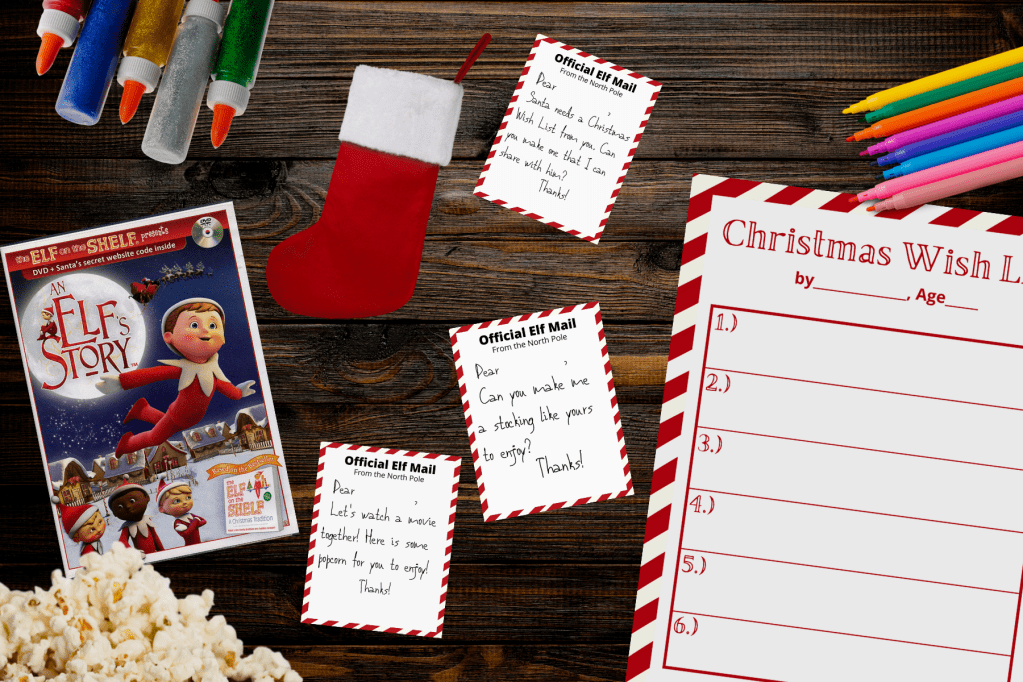
ELF ON THE SHELF STOCKING & WISH LIST

Get ready for your Elf to come! Elf On The Shelf can come anytime after Thanksgiving into December. Did your Elf already come? No problem, you can complete these activities with him! See below.
Before our Elf’s arrival, we got ready for him. We made our Christmas list (see below)& watched An Elf Story. After watching the video, we made a little stocking for him, just like the children did in the movie. I bought a mini stocking for a dollar and we wrote his name on it with glitter glue. When our Elf arrived, his stocking was hanging next to our daughters.
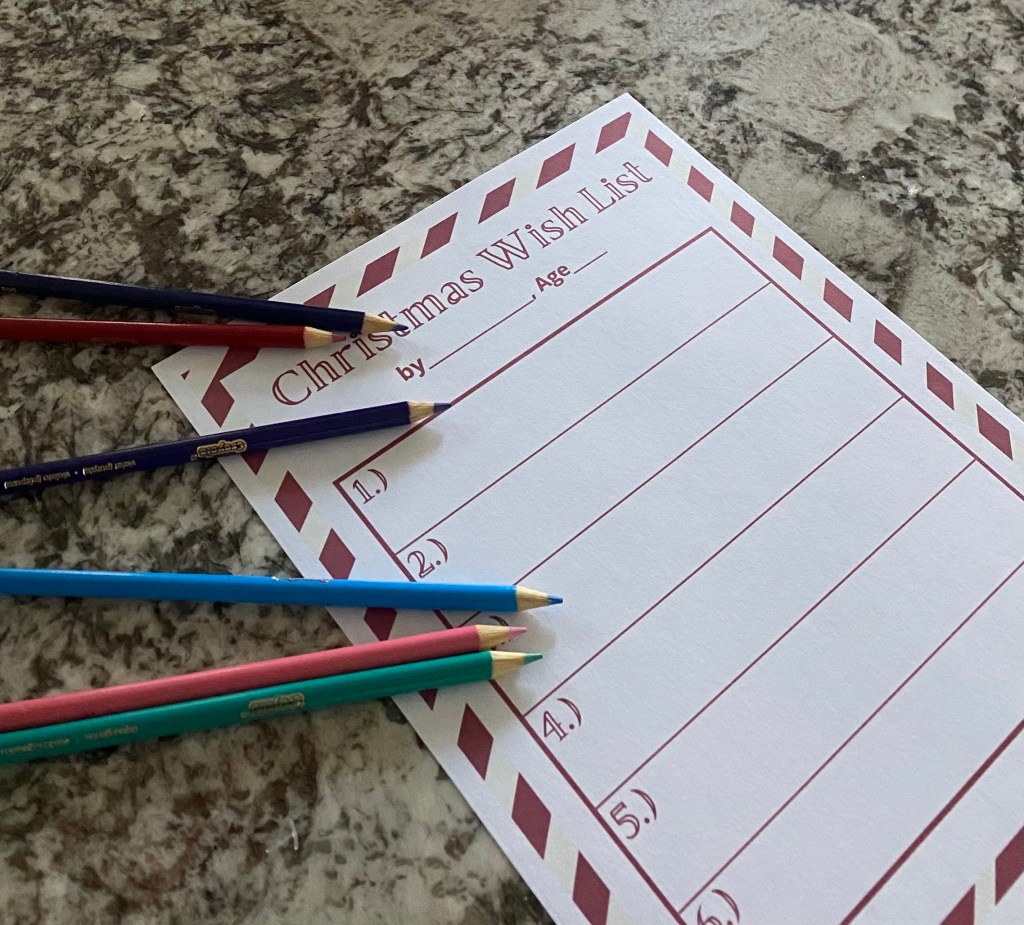
Christmas Wish List:
Print out the template. Older children- have them write out what they want. Younger children- have them draw pictures and an adult writes what the pictures are. You could also cut images out of magazines. You can use any materials to make it- markers, colored pencils, crayons. We used colored pencils.
Elf already here?
Leave a note out for your child/children to complete the activities with their Elf. Click on templates below.
Notes:
- Any stocking will do- you could even create one out of paper.
- The movie (An Elf’s Story) we found on TV & recorded it, there are also other Elf On The Shelf movies on Netflix. Or you can buy the dvds.
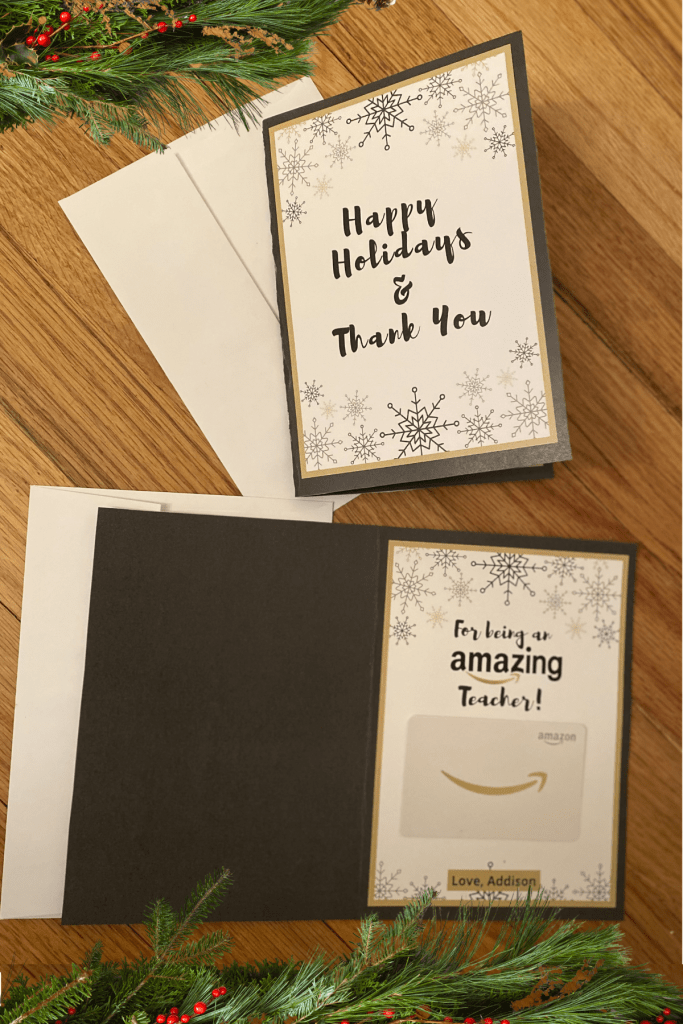
AMAZON HOLIDAY TEACHER CARD

Need a Christmas gift for your child/children’s teacher? Show your appreciation this holiday season with this card and an Amazon gift card attached. Super simple- just print, fold, and ready to go & you can mail it too!
Materials:
- Amazing Teacher Card template
- cardstock
- Printer
- Amazon gift card (choose navy & gold mini envelope to match)
- envelope 5×7
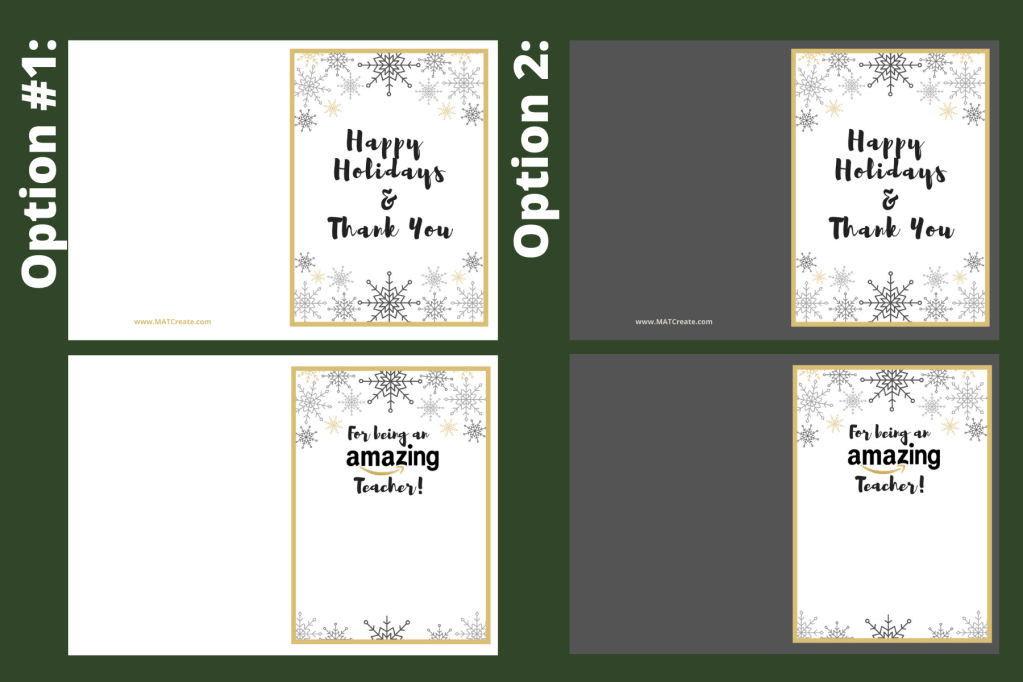
Directions:
1- Order a gift card from Amazon. Make sure to get the gold and navy option, so it matches the card. Amount options are $10-$25-$50-$100.
2- Download the card template. Choose which option to print (2 options- white vs. dark gray background)
3– Print the tempalte double sided on your printer. Then cut out the card. Once cut out, fold down the center (card is 5 x7 inches when folded in half).
4- Sign the card at bottom.
5- Using double side tape, attach gift card in bottom center, above name (see example). Regular tape works too- just make a flat donut out of the tape.
6– Put in envelope & write recipients’s name on it.
Notes:
- If printing multiple cards and you don’t want to use all of your ink, print at a copy store. I had mine printed at the UPS Store. They will also cut and fold the card for you (for an additional charge). I simply emailed them the template and then picked it up ready. I also bought single envelopes there as well. The going rate seems to be about $1.00 for color ink on cardstock per sheet.
- You can get copies locally, or at a chain store- Staples, UPS Store, FedEx Office all offer quick document printing via email.
Happy Gifting!

MAIL CARRIER CHRISTMAS GIFT

Don’t forget about your mail carrier at Christmas- rain or shine they deliver your mail. Show your appreciation for them with a simple small gift. Just leave it in the mailbox and they’ll find a nice surprise for them. Below are two different options to gift them.
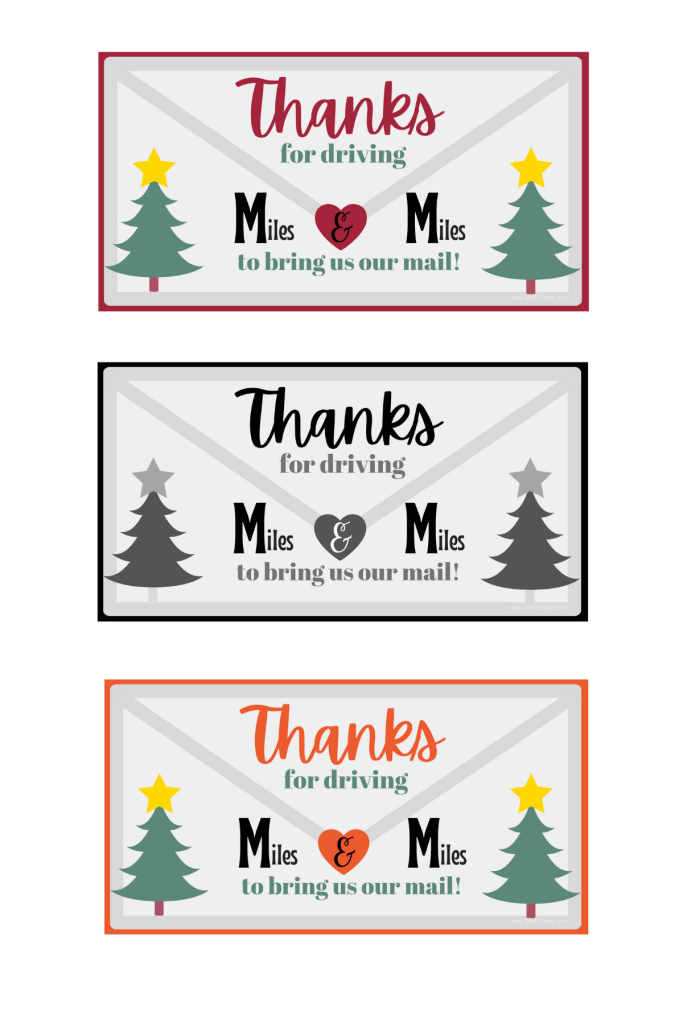
Option #1: M&M Thank You
- white cardstock
- printer (or professionally printed)
- M&M Template
- M&M Candy
- tape (regular (make donuts) or double sided)
Choose which template option you want (3 choices). Print template, cut out. Sign name on bottom. Attach to a pack or bag of M&Ms.
Option #2: Coffee Cup Giftcard Holder & Card
- white cardstock
- printer (or professionally printed)
- Coffee Cup Template
- Giftcard
- tape (double sided)
- glue
Print out template, cut out. Sign name on bottom. Glue the back part of the “sleeve” to the back of the cup. Lastly, add giftcard between cup and sleeve.

Happy Gifting!
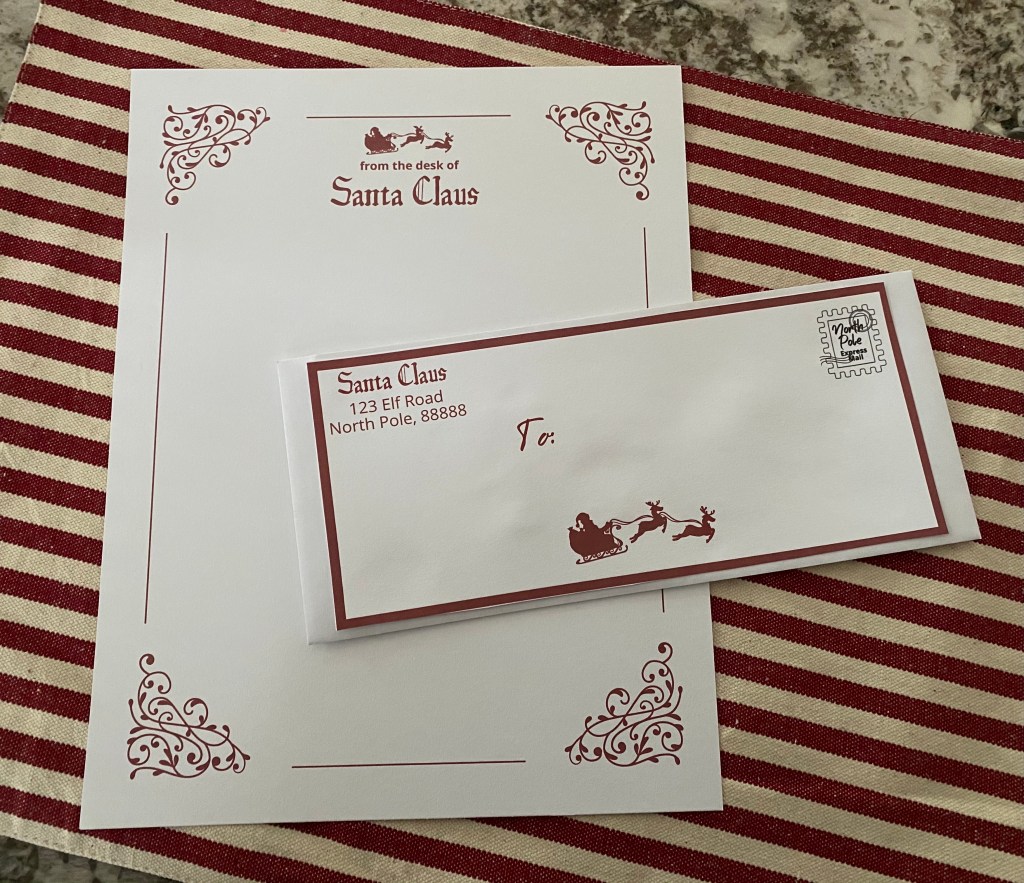
PRINTABLE LETTER TO SANTA & RESPONSE LETTER

Grab some hot chocolate and write your letter to Santa- tell him all about you & your wish list! Santa loves surprises, so include some from you artwork too! Then wait for Santa to send a return letter. This is a great holiday family activity. Free templates below!
Supplies:
- Letter to Santa Template
- Envelope Templates addressed to Santa & from
- Envelopes (9.5 x 4 1/8 inch)
- Artwork from child (fit into envelope)
- Return Letter From Santa
- Cardstock (and printer)
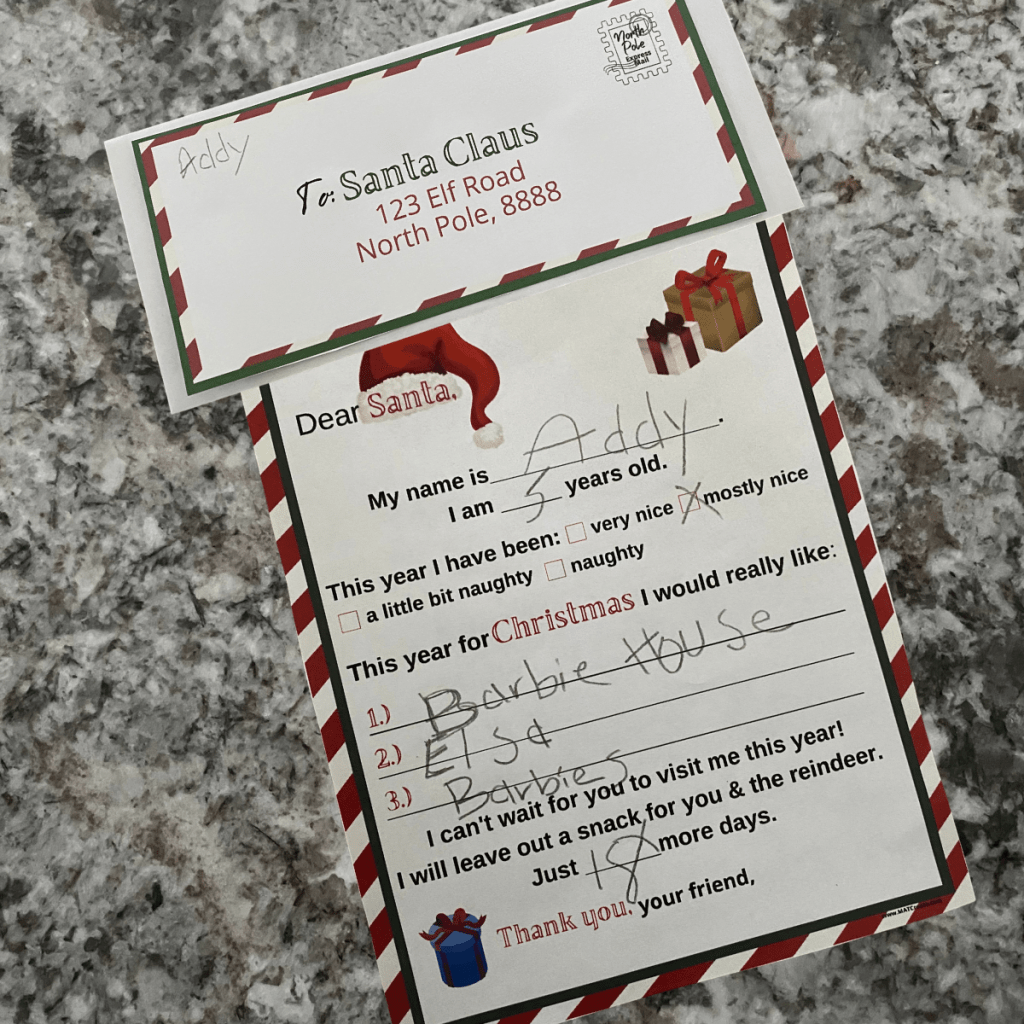
Process:
Before: Print out the Letter to Santa, Letter from Santa, and address templates for on envelopes. Cut out the envelope address templates & glue/tape onto envelopes.
_____________________________________________________________________________________________
Activity: Have your child or children fill out the letter(s) to Santa. Then have them make a piece of special artwork that will fit inside the envelope too. Once complete, place in the addressed envelope and have your child/children bring to your mailbox.
_____________________________________________________________________________________________
After: Get the letter from mailbox (best day to put in is Sunday, since no mail). Now, parents/ adult makes the letter from Santa. Make sure to include the child’s accomplishments over the past year that made you proud. Examples: doing well in school, cleaning room, being nice to siblings. You could also list anything he/she needs to work on.
Place letter & artwork in envelope with address & put with mail a few days later. Then watch the excitement from your child/children as they read their letter from Santa.
HO HO HO

