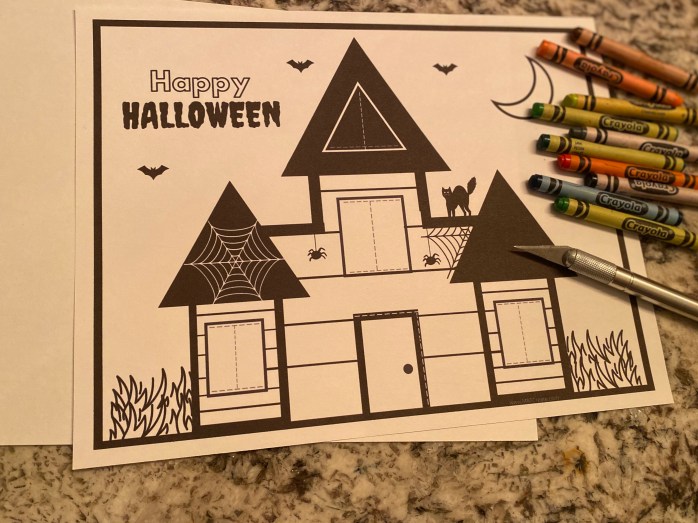
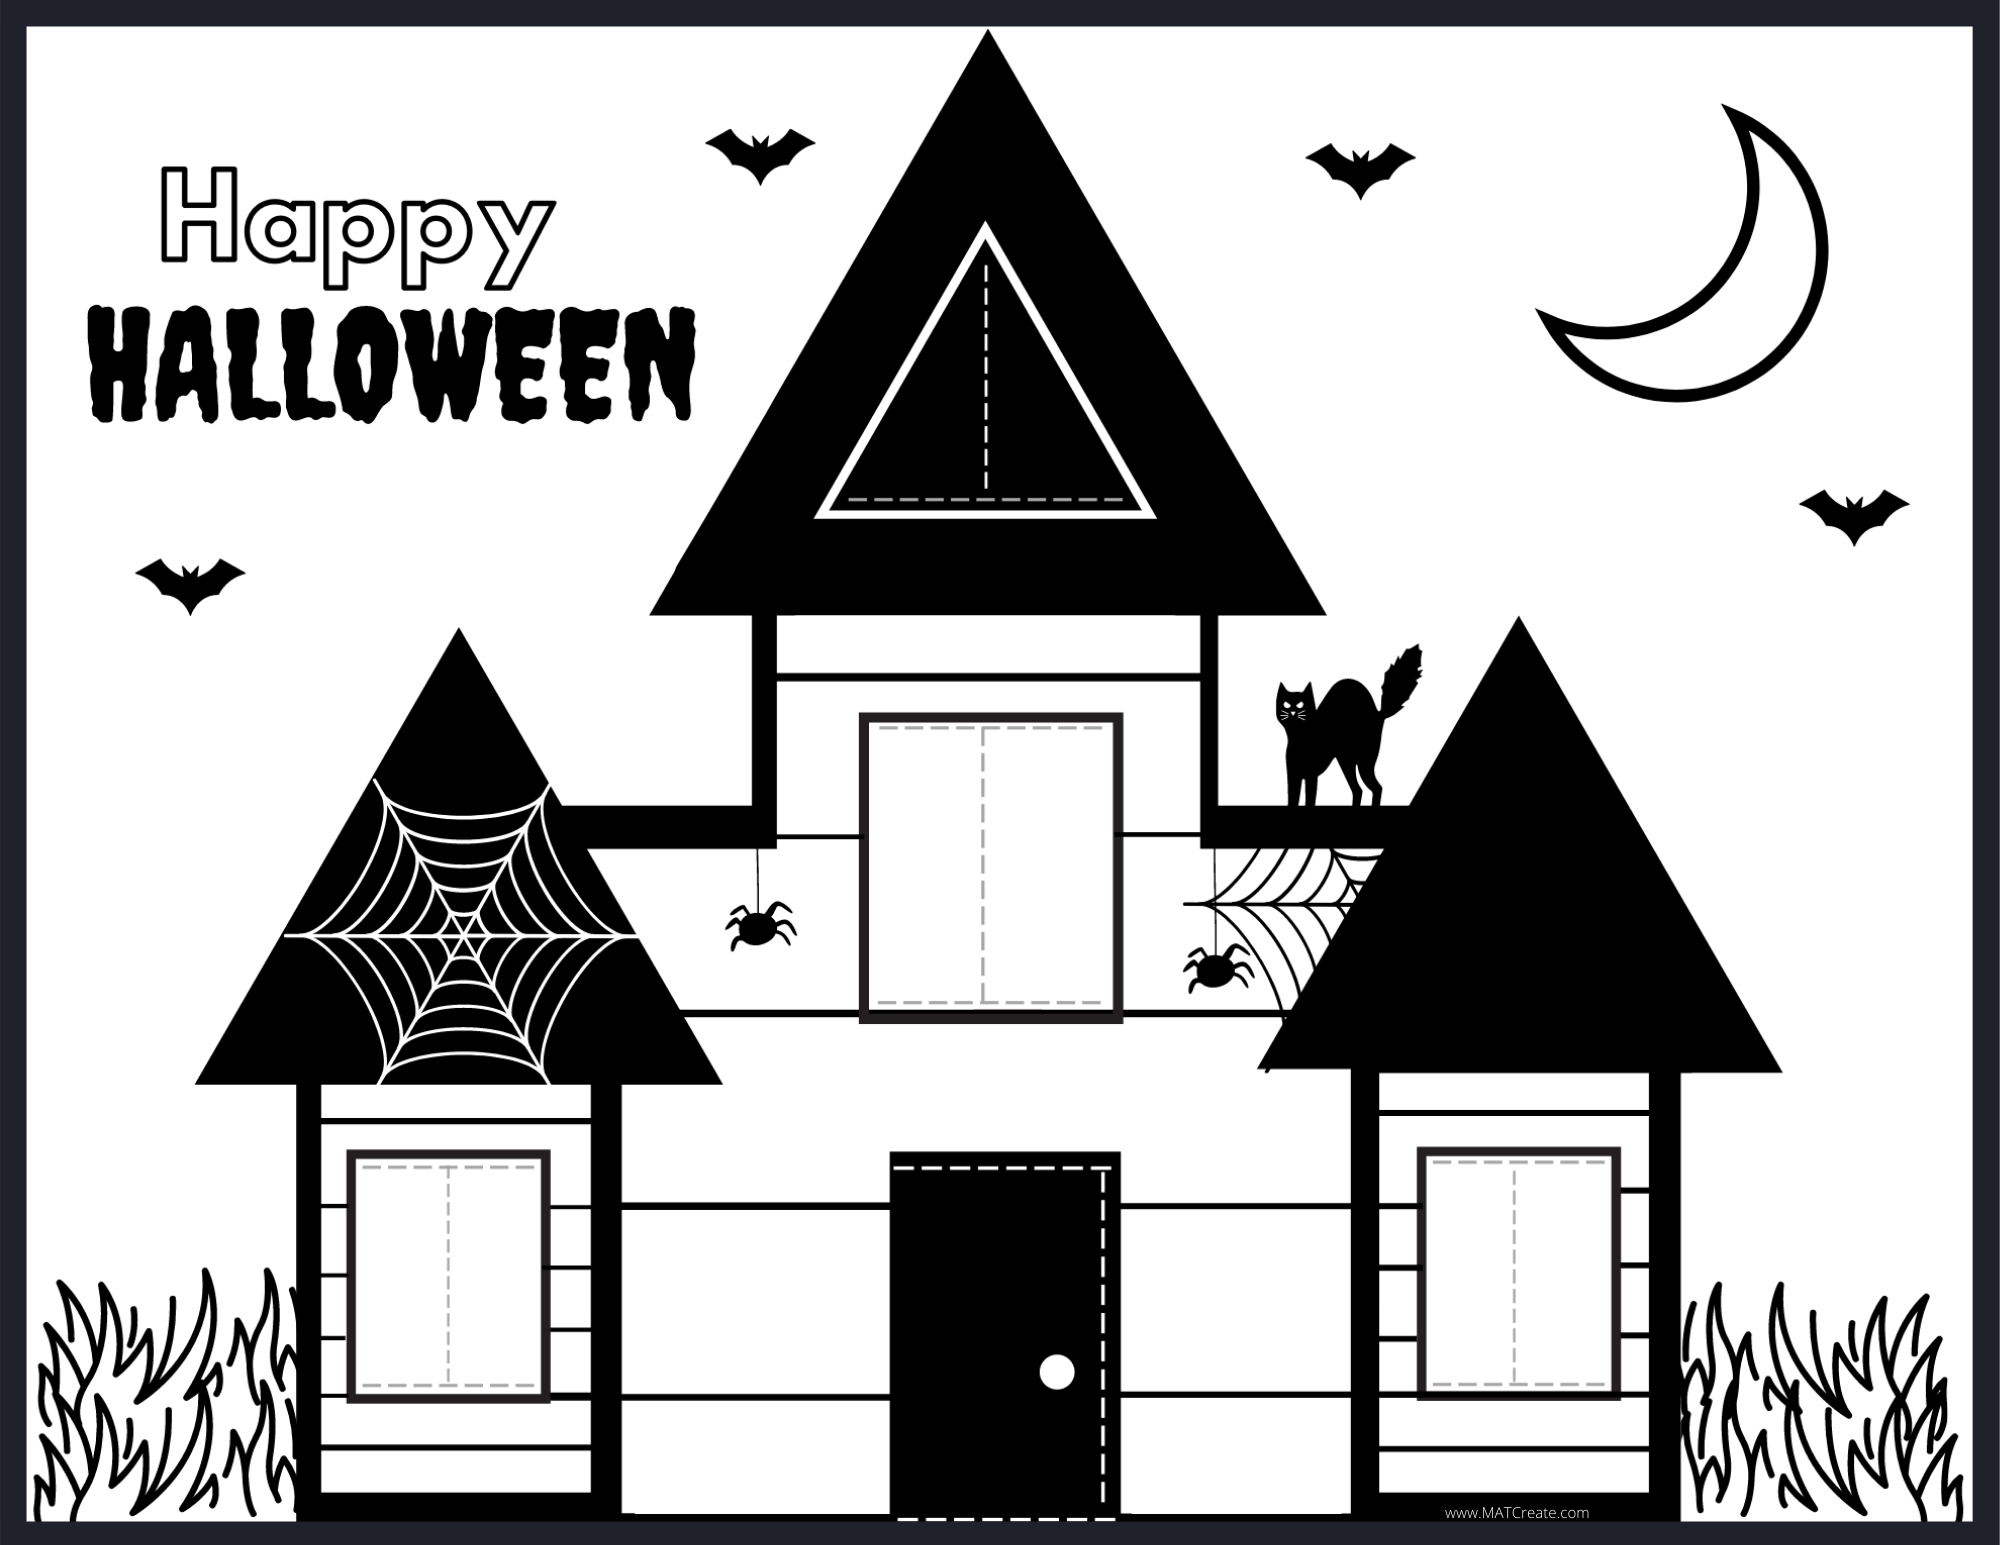
HAUNTED HOUSE PRINTABLE

It’s almost Halloween- time to get spooky! Make a 2D haunted house with windows and a door. Open them to reveal your spooky creatures. Boo! This activity can be differentiated based on skill level (see options below). Great for ages 2+.
Materials
- haunted house templates (see below)
- white cardstock
- crayons or markers
- glue or glue stick
- scissors
- X-Acto Knife (adult use only)
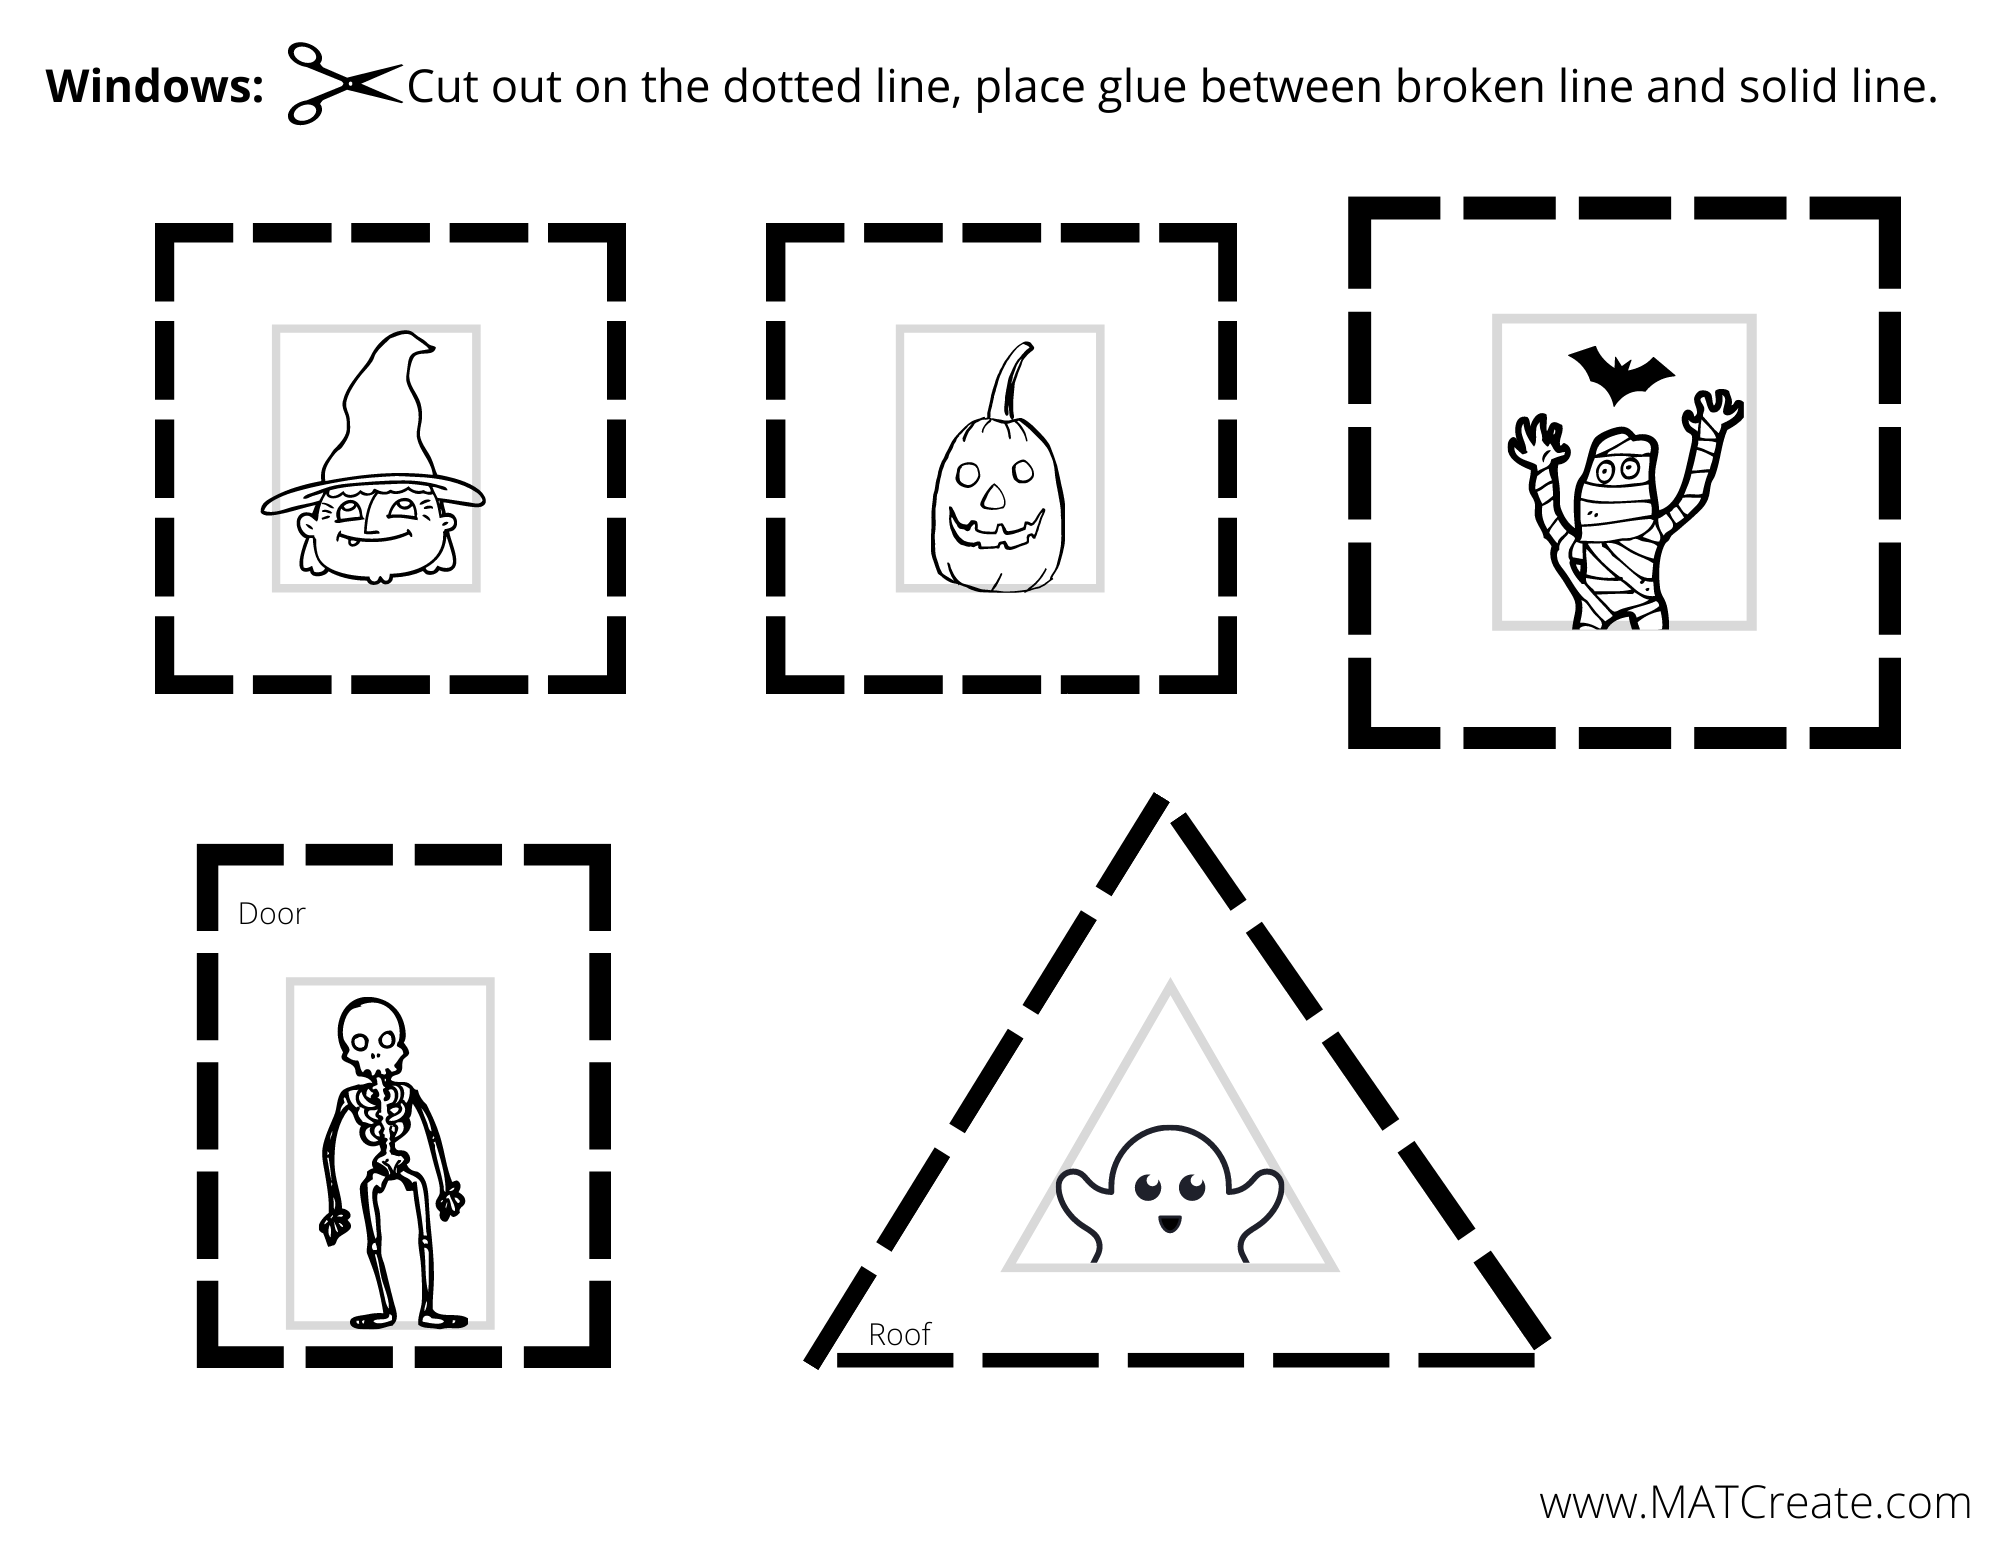
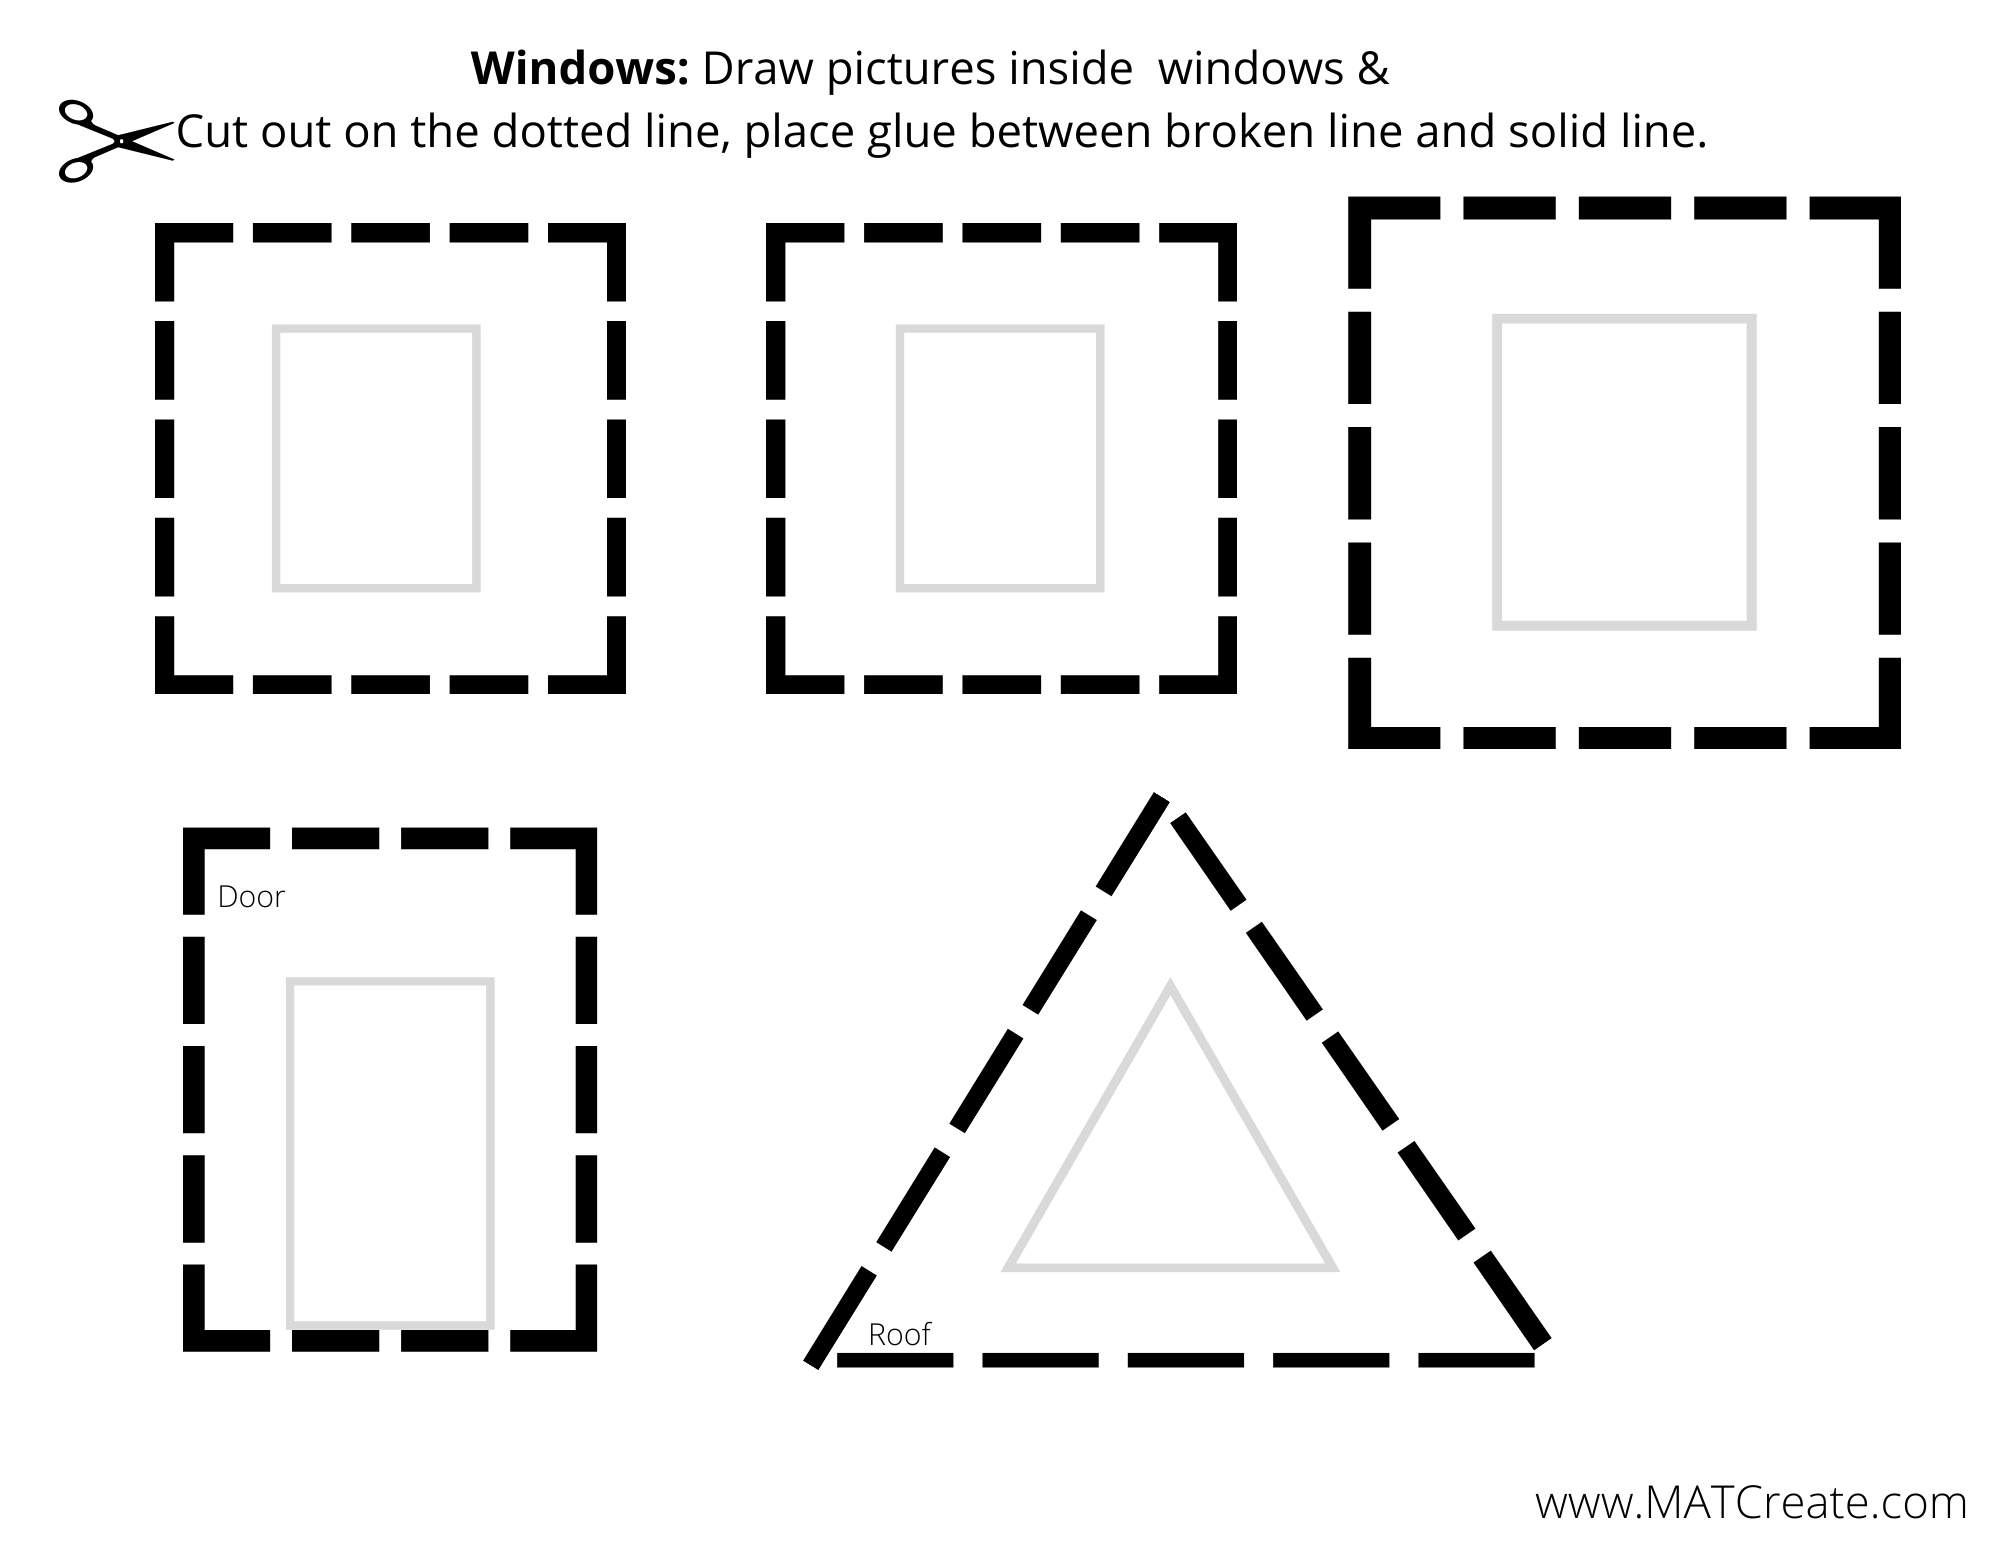
Note: This project can be differentiated by age. All children will need the Haunted House template. Choose one “inside template” based on skill level or what skills you want to review.
Focused skills: coloring, drawing, & cutting
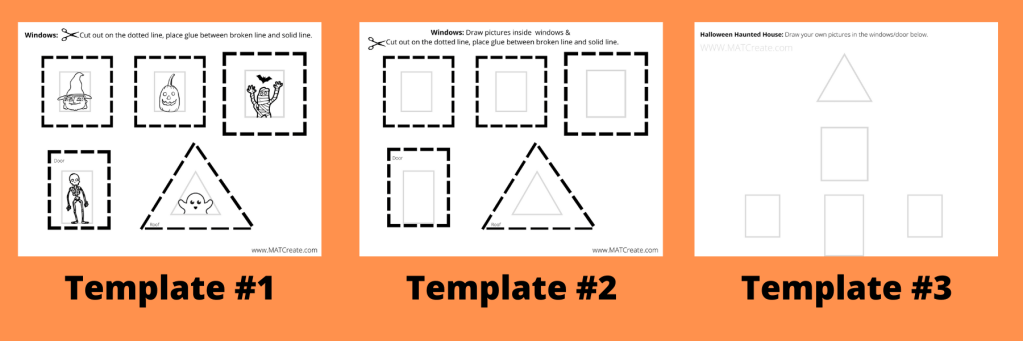
1.) Print Templates (2 total). Print out the Haunted House template and one of the inside templates (3 options). *Adult can cut if child too young.
Template #1: Color images and cut out, glue onto house.
Template #2: Draw your own pictures and then cut/glue onto house.
Template #3: Draw your own pictures, then glue entire sheet on back of house.
To Create:
1.) Color! Color the Haunted House. You can add more spooky things on outside of it too.
3.) Create! Add spooky things in your windows and doors on other template (if not using template #1).
4.) Cut! Have an adult, using an x-acto knife cut on the dotted lines that surround the windows and door.
5.) Glue! Attach your images behind the windows and door. Or glue entire sheet (template #3).
6.) Enjoy! Open and close your spooky Halloween House windows and door- how spooky is it? Scare your friends/family by sharing your artwork with them. Once done, hang up in your house for everyone to enjoy or give as a gift.
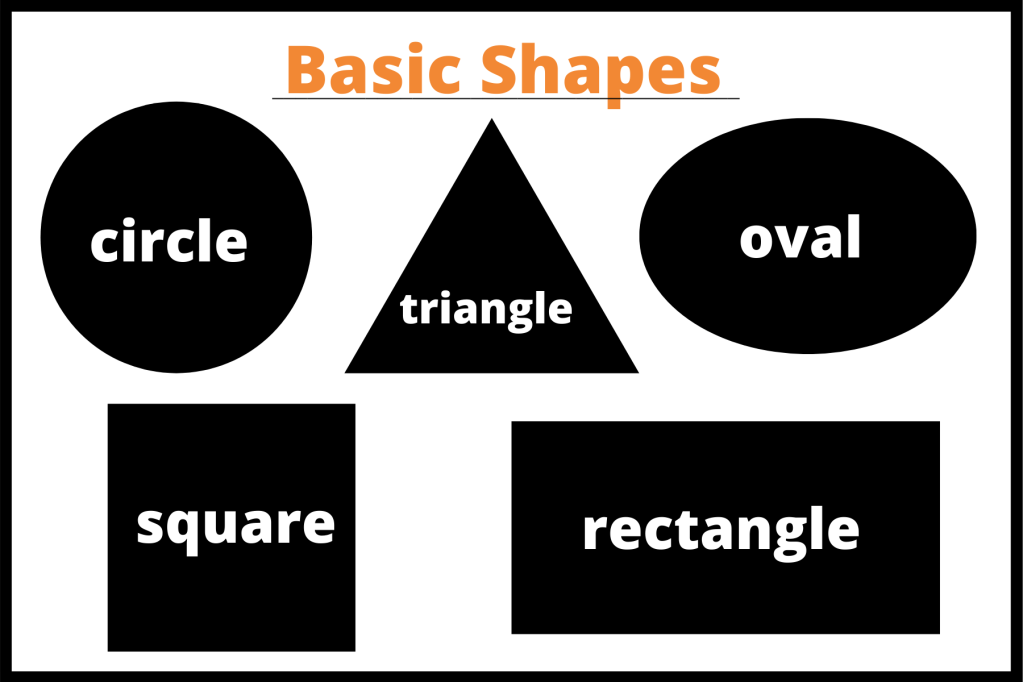
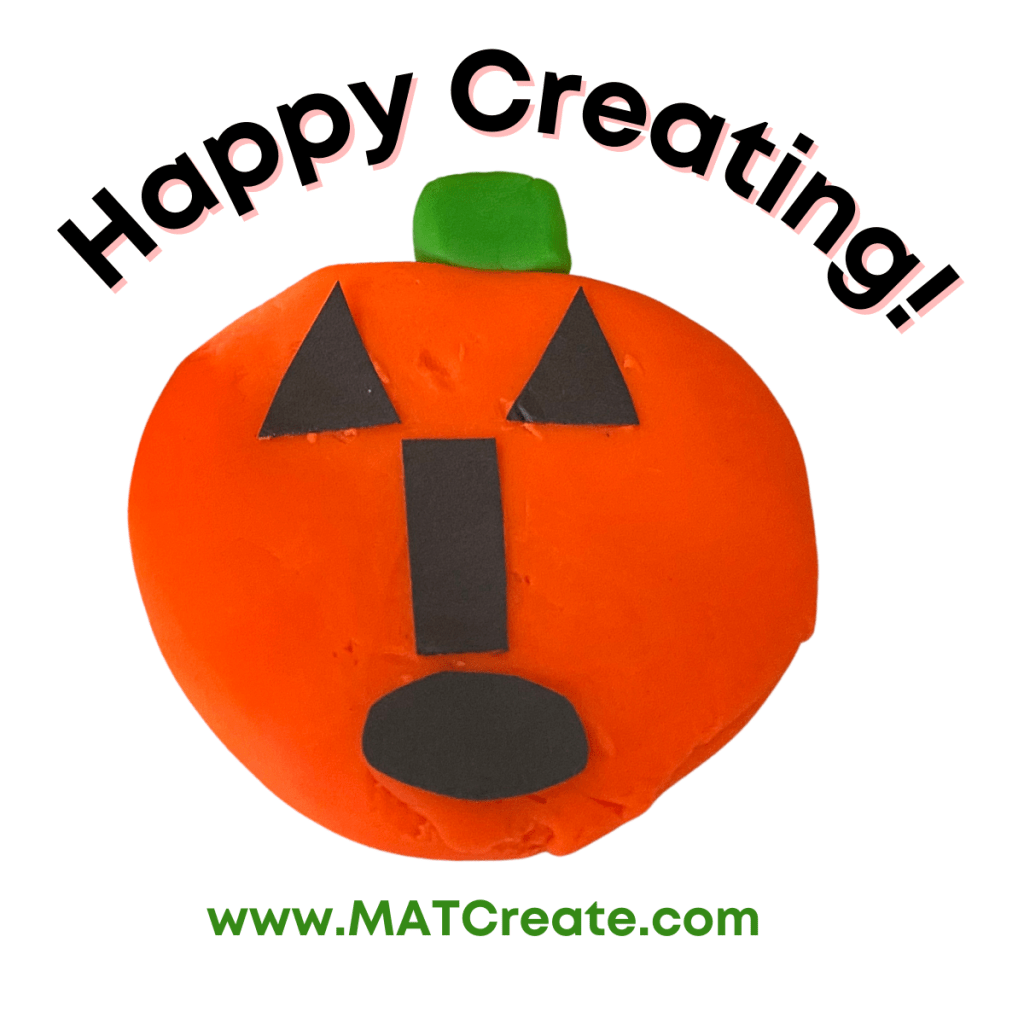
SHAPE JACK-O-LANTERNS

Review simple shapes and fine motor skills by making jack-o-lanterns out of paper shapes and Play-Doh. Perfect Halloween activity kids will enjoy without realizing educational.
Materials:
- orange & green Play-Doh
- back construction paper
- crayons (need white, black & orange)
- scissors
- worksheet (for practice)
- black marker (to draw faces on worksheet)
Process:
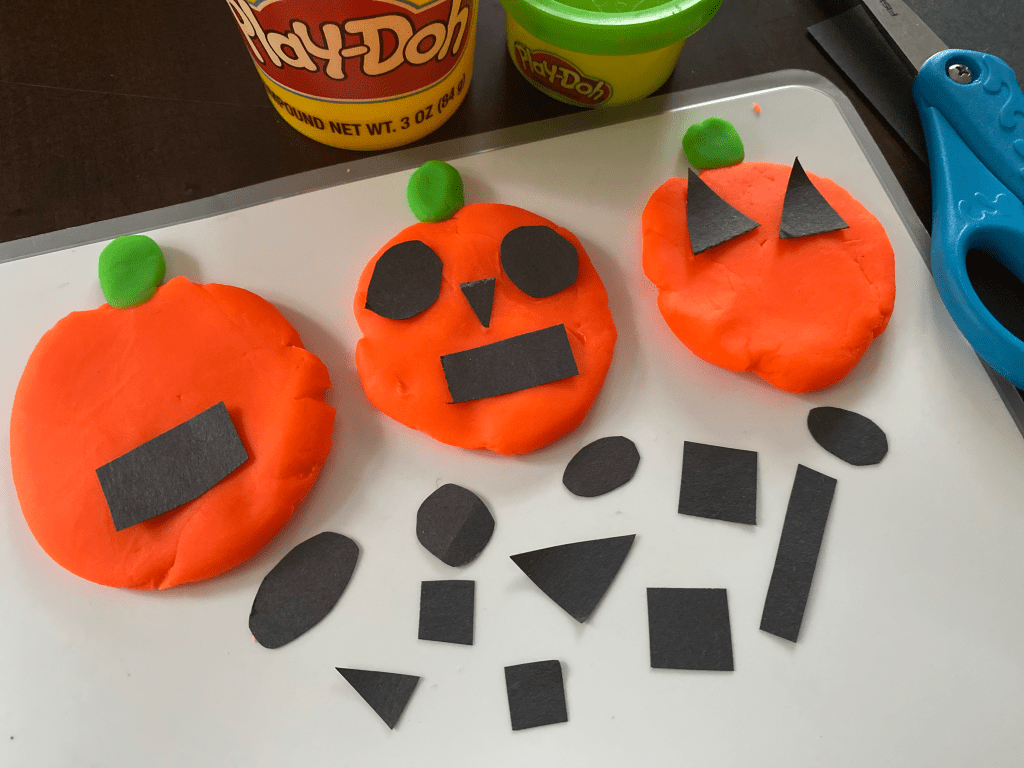
Start out by reviewing simple shapes that can be used to make pumpkins into jack-o-lanterns. What shapes do you see in the examples below?
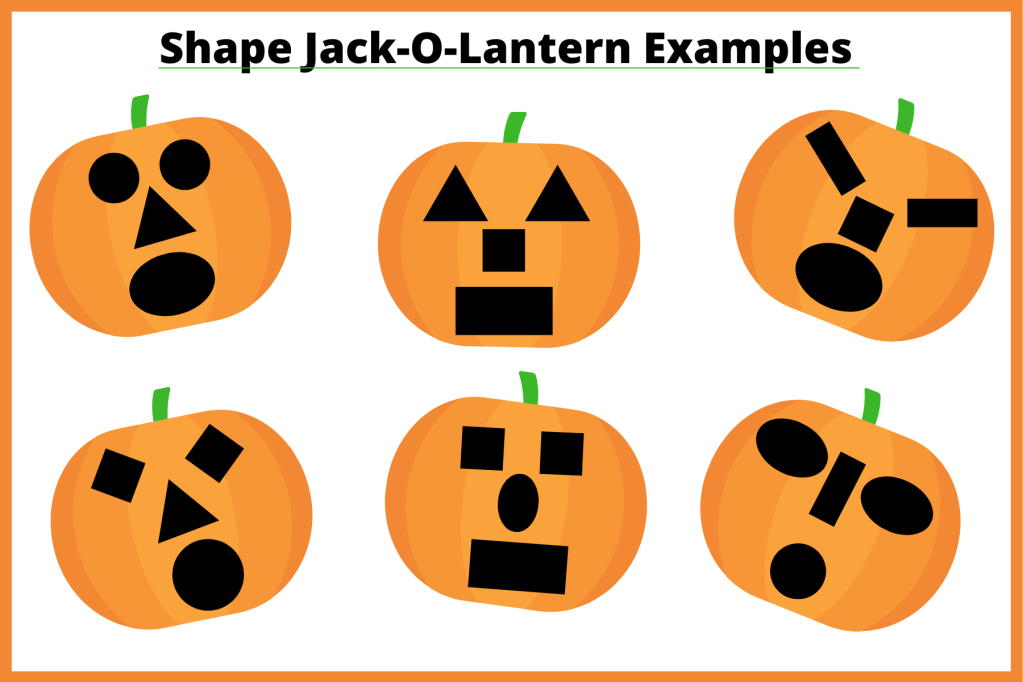
After reviewing shapes, complete the worksheet by practicing turning pumpkins into shape Jack-o-lanterns.
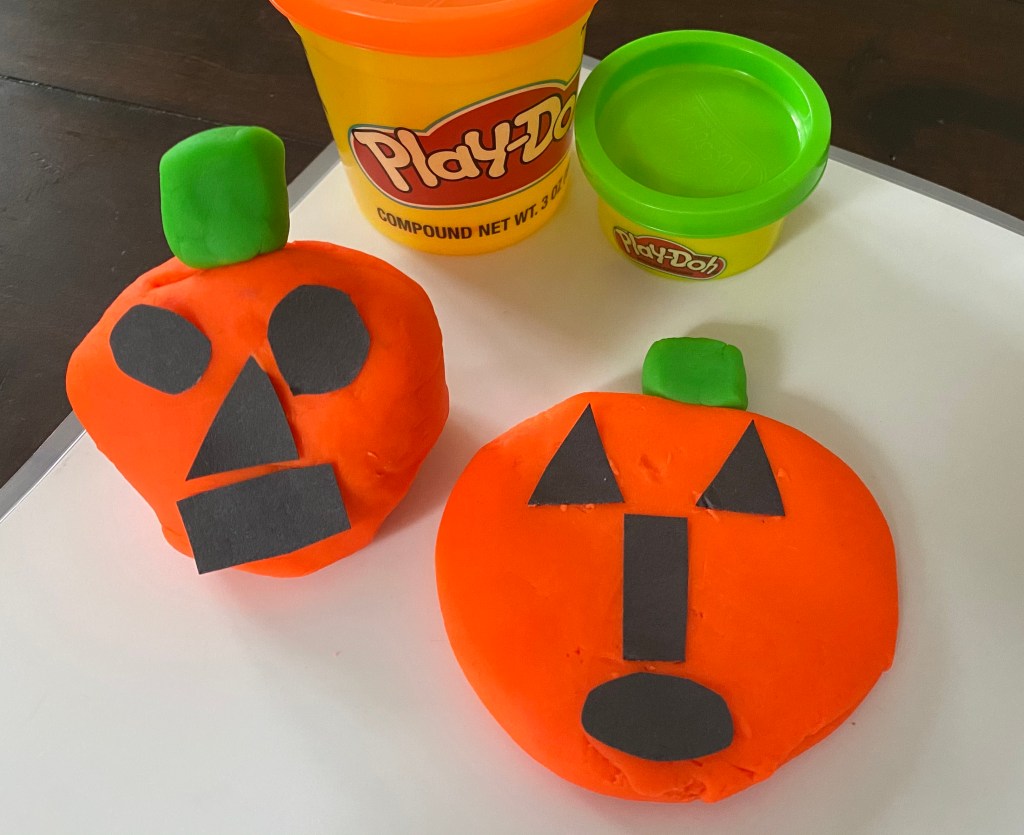
1.) Using orange Play-Doh, make a big ball. Flatten the ball. It should be a flat circle once complete. Then, using green Play-Doh make a small stem at the top. To make the stem- make a very small ball, flatten, shape into rectangle & place on top. Pumpkin complete!
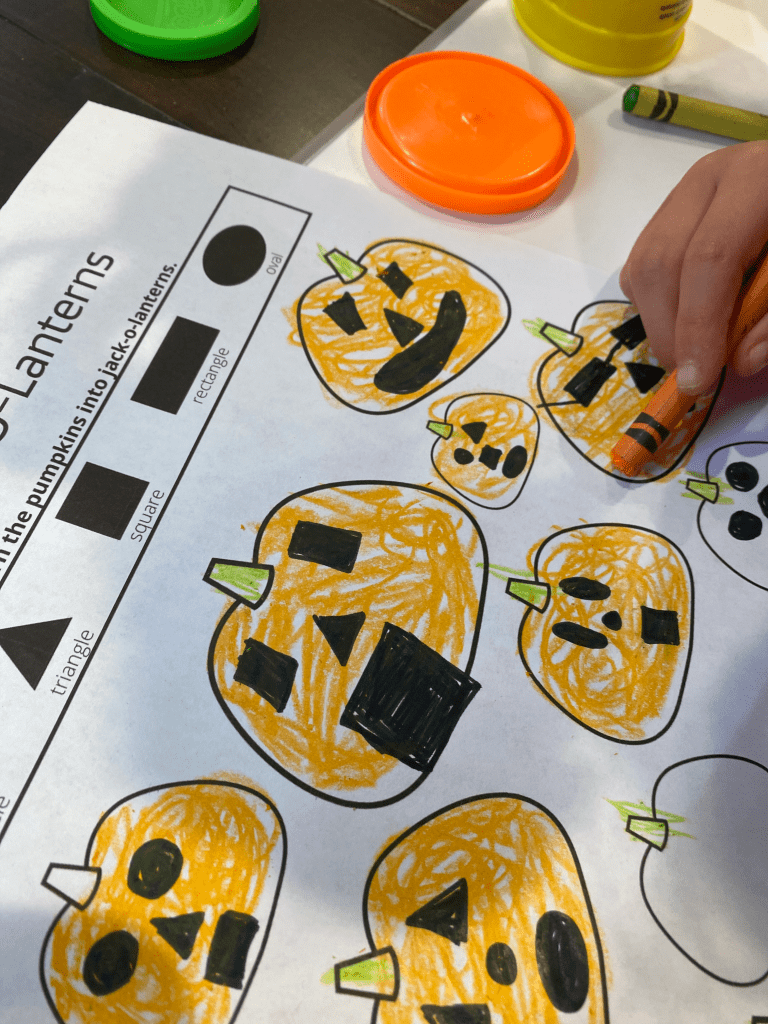
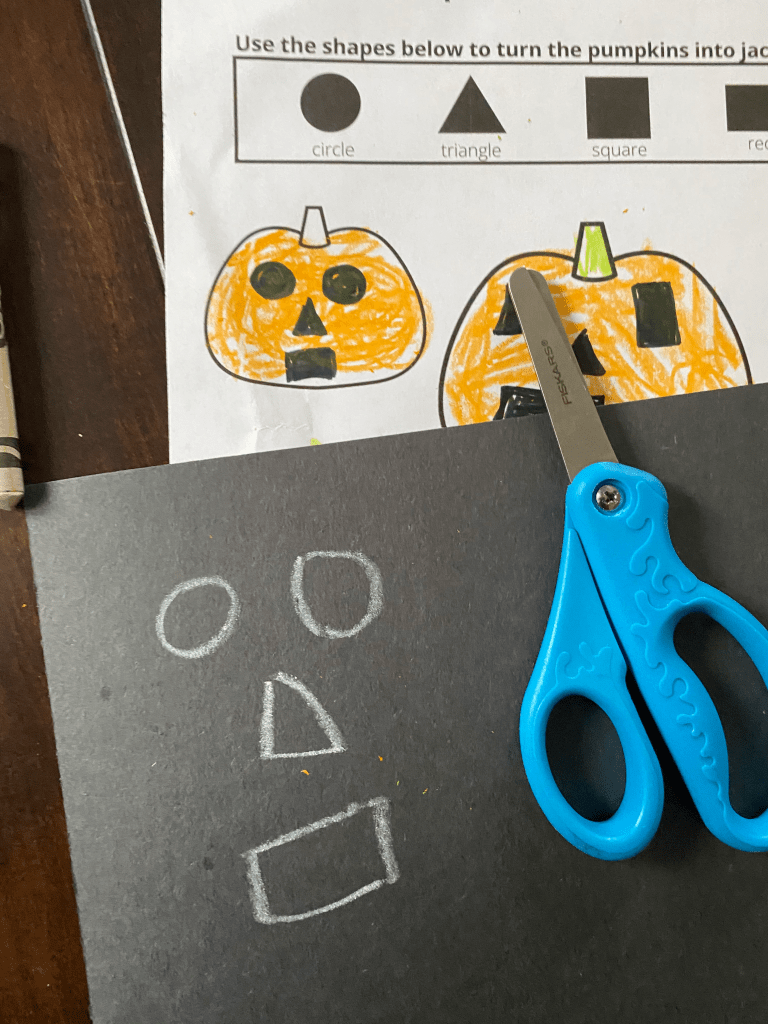
2.) Looking at the completed worksheet, create one of the pumpkins from it. What shapes do you need? Draw those shapes on the black construction paper with a white crayon. Cut out and place on the pumpkin.

Size relationship– help your child figure out what size eyes-nose-mouth work on their pumpkin by trial and error (don’t tell them). This will sneak in extra cutting practice too.
3.) Make several different faces from your worksheet. Which is your favorite? Why?
Examples:
Notes:
- You can find a single can of orange or green Play-Doh at Dollar tree for a dollar (normal size) or at Walmart for 50 cents (mini can).
- Differentiate by age: For younger kids, cut out the shapes for them. Review by taking turns making different faces and asking what shapes they are. Also, make the pumpkins much larger (use whole container of Play- Doh).
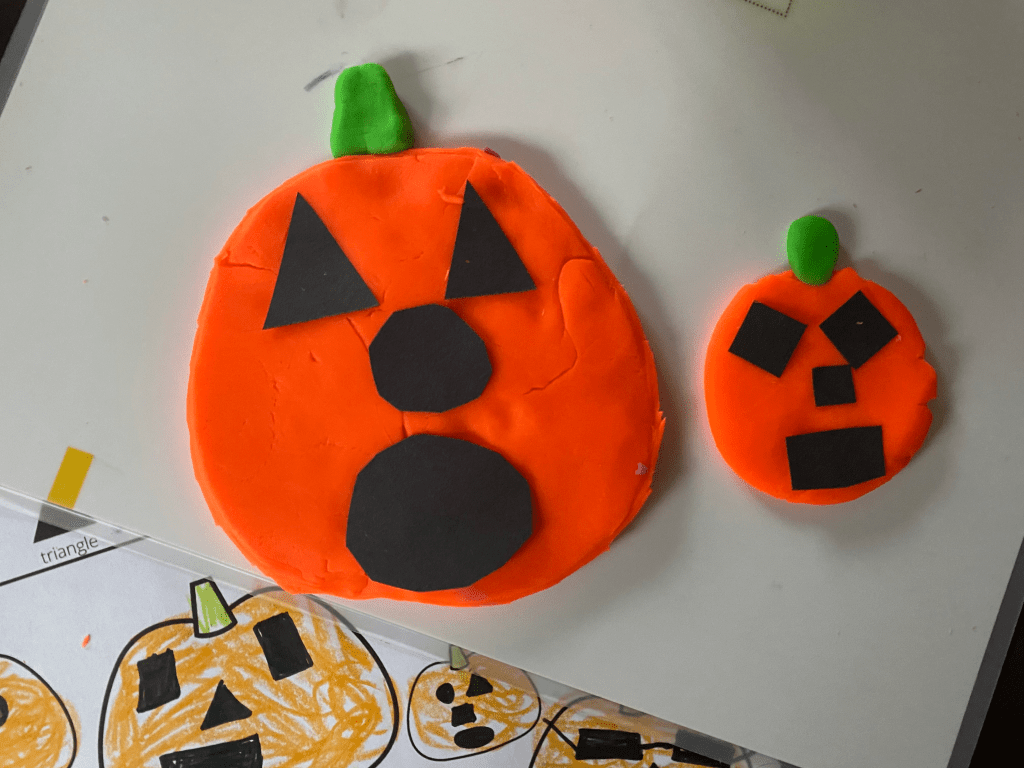
- For older kids who are learning or know how to use scissors, have them cut out the shapes and review. They can also make the pumpkins 3-dimensional, instead of flat (see example below).
- If child/children sad about not having a project to keep, since Play-Doh dries up, use non-hardening clay, model magic, or paint/color a white paper plate orange and use that instead.
Halloween Bucket List
Happy Halloween! Click on the list below to print and let the fun begin. How many can you complete?
HALLOWEEN BOOK LIST

Get ready for Halloween with these great books- from old favorites to new, check out my list below! Best for babies up to eight years old. Grab these books at your local library, start your own at home collection or watch a video of them.
Every October 1st I bring out our Halloween books for the month only and they’re a big hit in our house. By doing this, it makes them extra special.
Click on the image below for your own pdf copy!
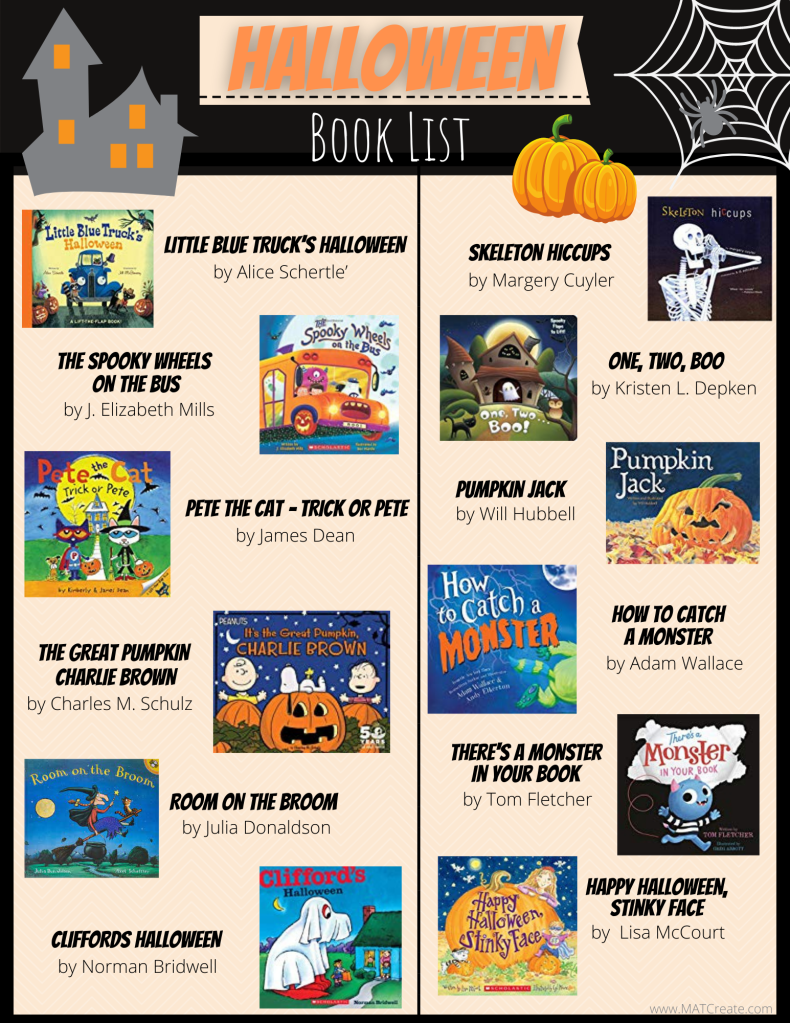
1.) Little Blue Truck’s Halloween by Alice Schertle
Beep! Beep! It’s Halloween! Little Blue Truck is picking up his animal friends for a costume party. Lift the flaps in this large, sturdy board book to find out who’s dressed up in each costume! Will Blue wear a costume too? Baby- 3 years old, Read aloud click here
2.) The Spooky Wheels on the Bus by J. Elizabeth Mills
A haunted Halloween bus ride that will have children singing with excitement.THE SPOOKY WHEELS ON THE BUS is a humorous Halloween-themed version of the classic song THE WHEELS ON THE BUS…with a few ghoulish tricks and treats up its sleeves! Count from One Spooky Bus up to Ten Goofy Ghosts as this Halloween ride races through town picking up a few unsuspecting passengers along the way. Ages 3-5 Read aloud click here – Song & video click here
3.) Pete the Cat: Trick or Pete by James Dean
Pumpkins, candy, and costumes! With flaps that reveal fun Halloween surprises, this Pete the Cat holiday story is sure to be a sweet treat for your little trick-or-treaters.Follow Pete as he goes trick-or-treating from house to house and discover what is waiting behind each door. Ages 4-8 Read aloud click here
4.) It’s the Great Pumpkin Charlie Brown by Charles M. Schulz
It’s Halloween night, which means costumes, trick-or-treating, bobbing for apples…and waiting for the Great Pumpkin. Linus is certain that the Great Pumpkin will rise out of the pumpkin patch to bring toys to all the children of the world. Could this be the year that it finally happens? Age 4+, Read aloud click here *Also comes in DVD format.
5.) Room on the Broom by Julia Donaldson
The witch and her cat are happily flying through the sky on a broomstick when the wind picks up and blows away the witch’s hat, then her bow, and then her wand! Luckily, three helpful animals find the missing items, and all they want in return is a ride on the broom. But is there room on the broom for so many friends? And when disaster strikes, will they be able to save the witch from a hungry dragon? Ages 3-7, Read aloud click here. * Also made into a DVD.
6.) Clifford’s Halloween by Norman Bridwell
Out of all the holidays, Emily Elizabeth and Clifford like Halloween the most. They play games, trick-or-treat in the neighborhood, and tell ghost stories. Best of all, they can wear costumes! Clown, witch, knight, or ghost – what will Clifford decide to dress up as this year?! Ages 3-5, Read aloud click here
7.) Skeleton Hiccups by Margery Cuyler
Skeleton wakes up with the hiccups. His friend, Ghost, suggests several ways Skeleton can get rid of them, but nothing works. Finally Ghost has an idea and scares those hiccups right out of Skeleton. Full color. What’s the best way to help a skeleton get over his hiccups? Ages 3-8, Read aloud click here
8.) One, Two, Boo by Kristen L. Depken
Carve out family time for this Halloween read — the littlest trick-or-treaters can lift the flaps to count their way through a spooky old house . . . but they had better be prepared for a few surprises! Baby to 3 years old, Read aloud click here
9.) Pumpkin Jack by Will Hubbell
The first pumpkin Tim ever carved was fierce and funny, and he named it Jack. When Halloween was over and the pumpkin was beginning to rot, Tim set it out in the garden and throughout the weeks he watched it change. By spring, a plant began to grow! Will Hubbell’s gentle story and beautifully detailed illustrations give an intimate look at the cycle of life. Ages 4-8, Read aloud click here
10.) How to Catch a Monster by Adam Wallace
Get ready to laugh along in this fun children’s monster book as a brave young ninja heads into the closet to meet the monster that’s been so scary night after night! But what if our monster isn’t scary at all? Maybe our hero is about to make a friend of the strangest sort…Ages 4-8, Read aloud click here
11.) There’s a Monster in your Book by Tom Fletcher
This interactive read-aloud will have kids tilting, spinning, and shaking the book to get the adorable little monster out! That’s right! He’s out of the book . . . and in their room somewhere. Uh-oh!! Age 3-7, Read aloud click here
12.) Happy Halloween, Stinky Face by Lisa McCourt
Stinky Face can’t wait for this Halloween adventure!Stinky Face is getting ready for Halloween when he has a question–which of course Mama knows the perfect answer to! Even though Stinky Face can think of a million things that could go wrong while trick-or-treating, Mama knows that no matter what happens, he’s going to have the best night ever. That is if he can settle on a costume!A funny, Halloween adventure perfect for trick-or-treaters everywhere! Age 3-5, Read aloud click here
- MAT Create is a participant in the Amazon Services LLC Associates Program, an affiliate advertising program designed to provide a means for MATCreate to earn small fees at no cost to you by linking Amazon.com and affiliated sites. The small fees are then used for supplies to make more posts.
HALLOWEEN COUNTDOWN

Halloween is coming- kids are excited! Instead of them asking you everyday how long until Halloween- make a countdown! On October 1st start to count down with your family how many days until Halloween. Of course its educational too- they will review counting backwards and review odd/even numbers.
You may countdown from any date, it doesn’t have to be from October 1st. It could be 13 days away too (October 18th) or 10 days (October 21st).
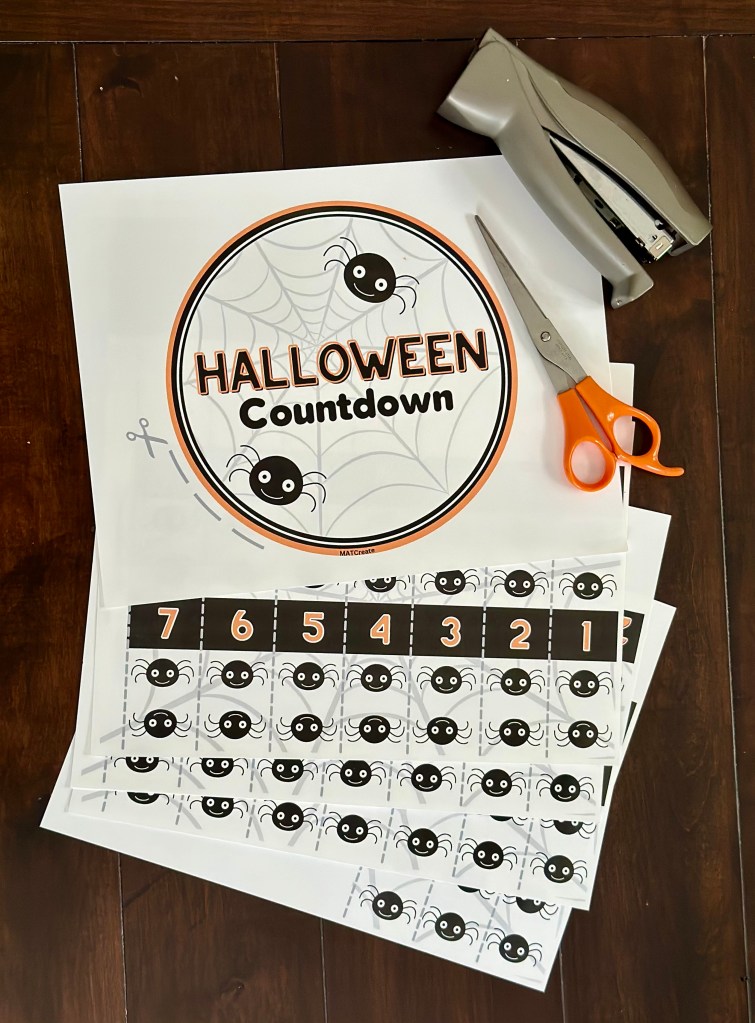
Materials
- Spider Web Halloween Countdown Template
- White cardstock
- printer
- scissors
- stapler
Directions:
1.) Decide how many days long your countdown will b. Print out the pages you need.
2.) Cut out the large circle.
3.) For the chain, cut on the dotted lines vertical. You will then have 30 strips. Depending on what % your printer prints it on, you many have to trim the edges. I always print on 98 or 100 to avoid extra margins.
4.) Startin with #1, make into a circle. Overlap the bottom all white part with the chain top with spiders on. The plain white part will go under the top part. Staple together.
5.) Then overlap #2 inside of #1. Staple together.
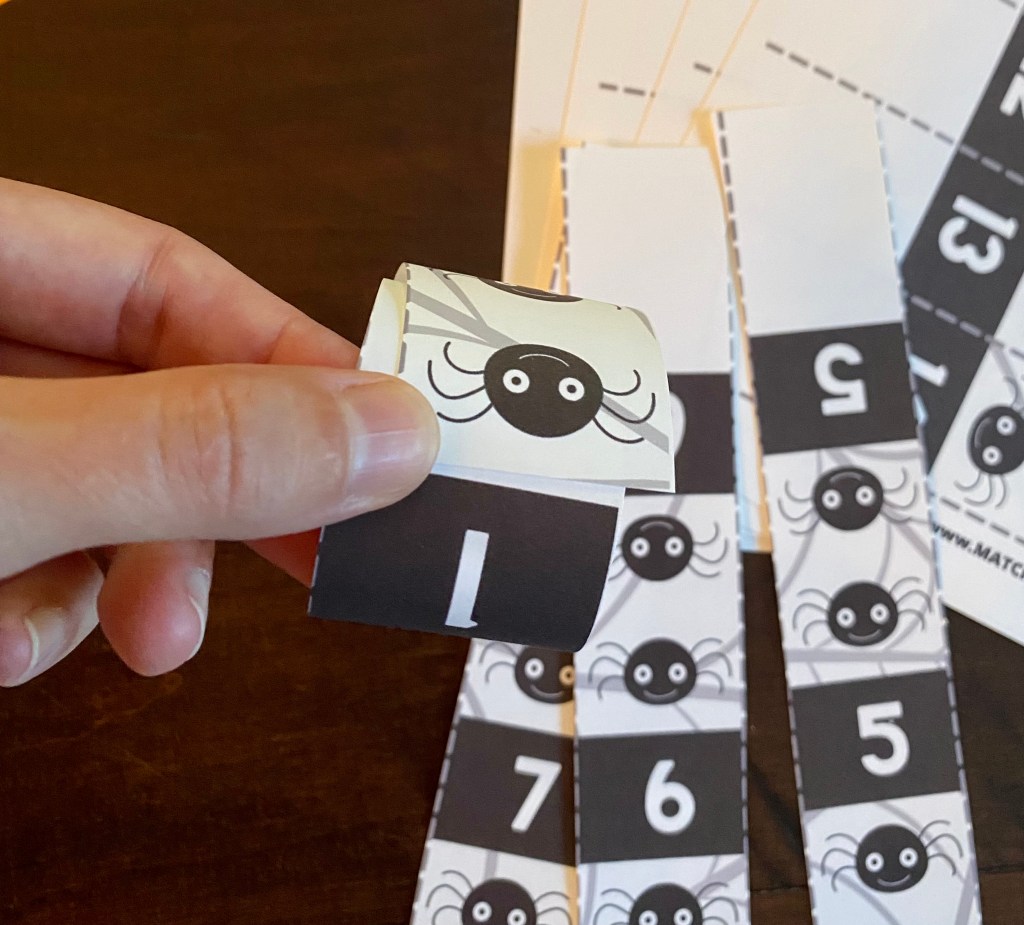
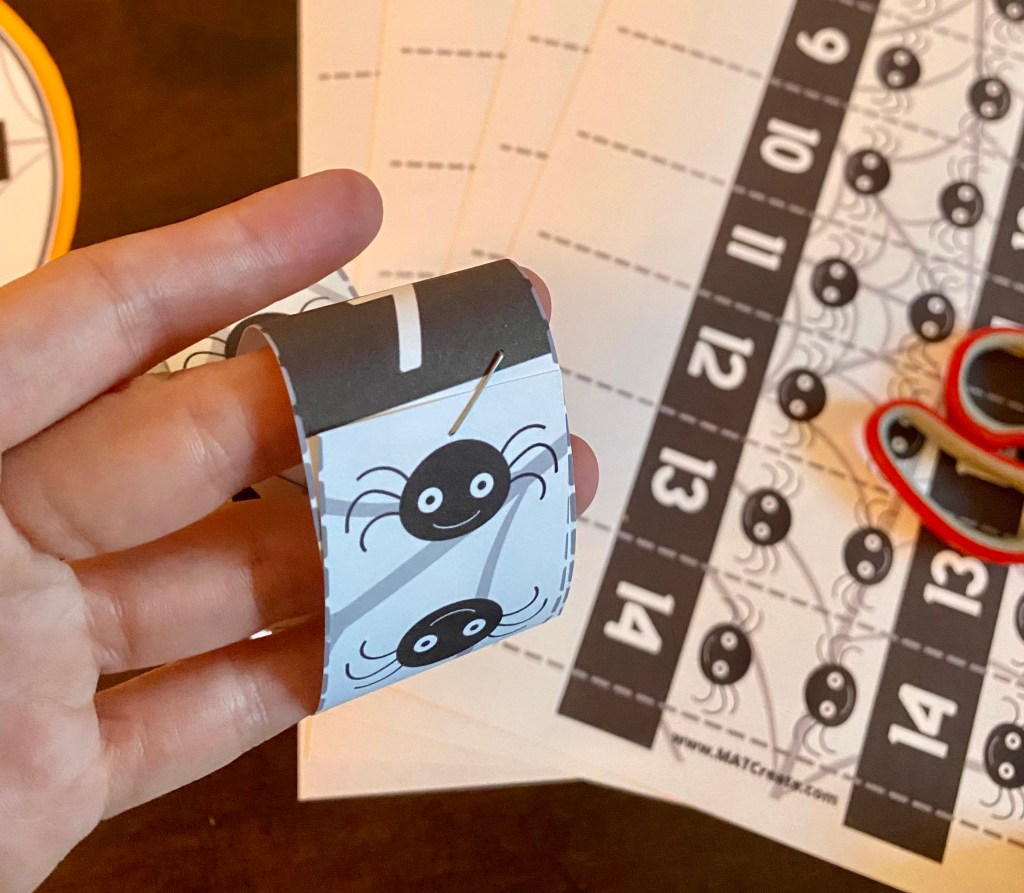
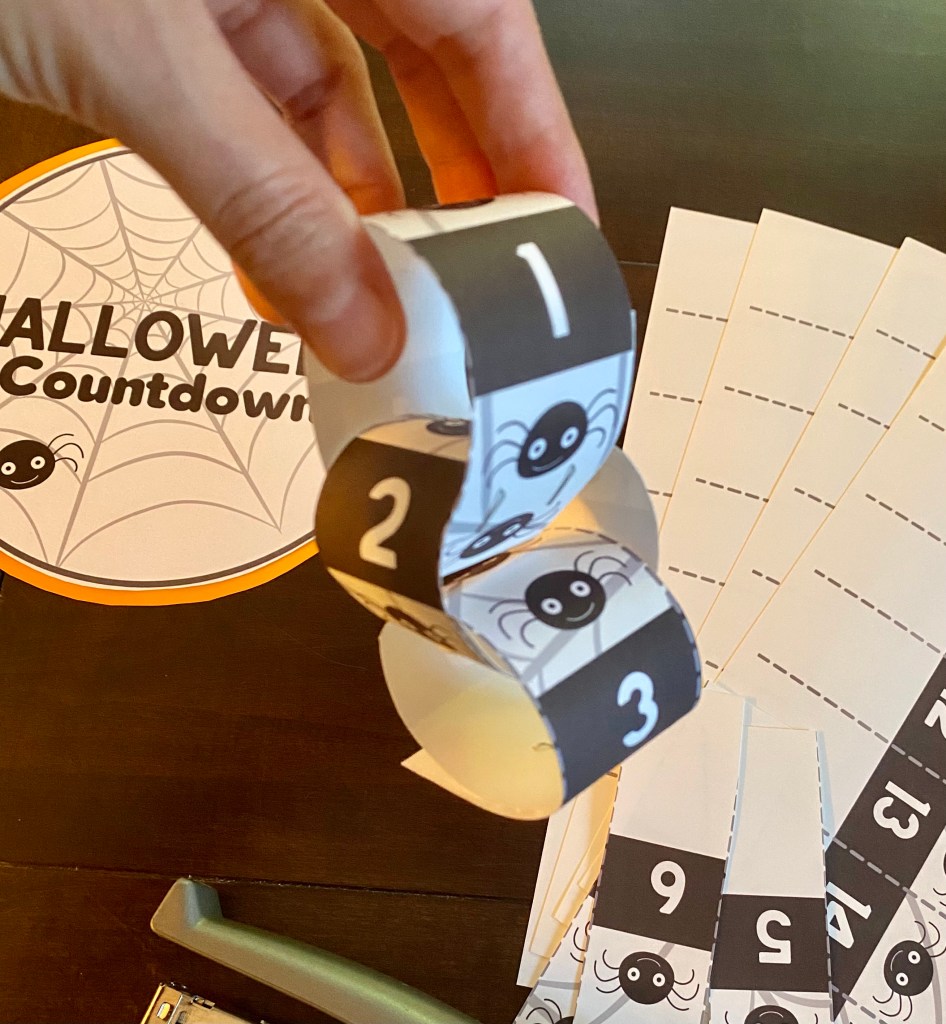
6.) Repeat until all numbers up to #30 are complete or to the number you want.
7.) Attach the top of the chain (#1) to the bottom of the circle by stapling (see example). Find a place in your house to display it. We will have ours in the kitchen. Every morning we tear off a chain link to countdown.
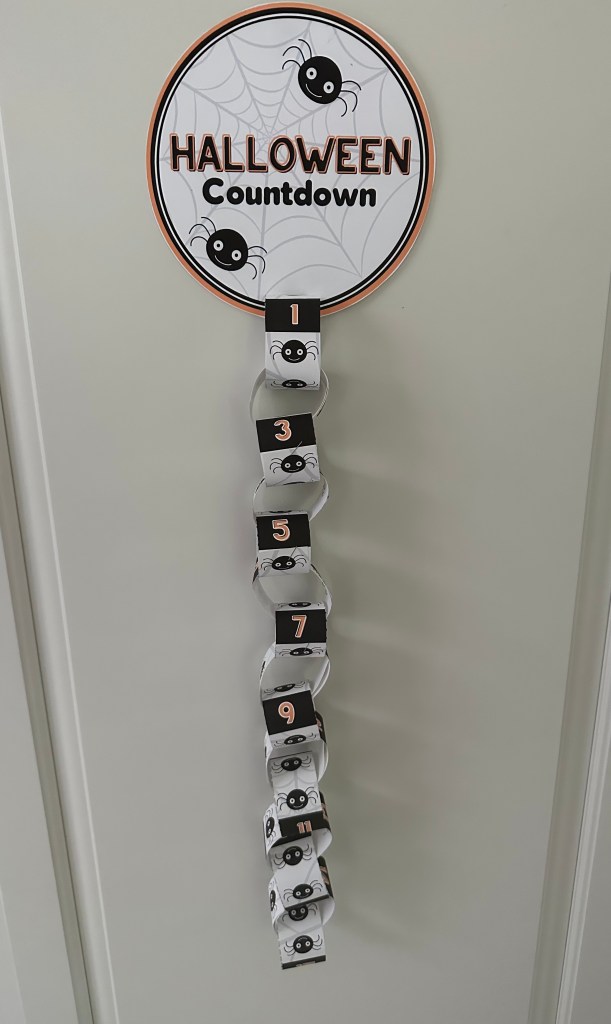
Happy Counting! Have a spooktacular Halloween!
BUGS & KISSES TREAT

Need a fun treat to give out at Halloween? This is your treat! Who doesn’t love bugs and chocolate!?! Takes only a few minutes to make & then let them enjoy!
Materials:
- Bugs & Kisses Printable
- white cardstock
- printer
- scissors
- stapler
- plastic bugs
- Hershey Kisses
- clear plastic bags
Notes: This is a great activity to have your kids help with. Review math by having them count out the number of Hershey Kisses and bugs for each bag. Let them decide who they are for and then gift give! By doing this, shows the importance of giving too, and not always receiving.
I got my bugs at a dollar store, any bugs will work! In my bags are flies, ants, and spiders. Most store will have a Halloween section & they can be found there (DollarTree, Walmart, Target).
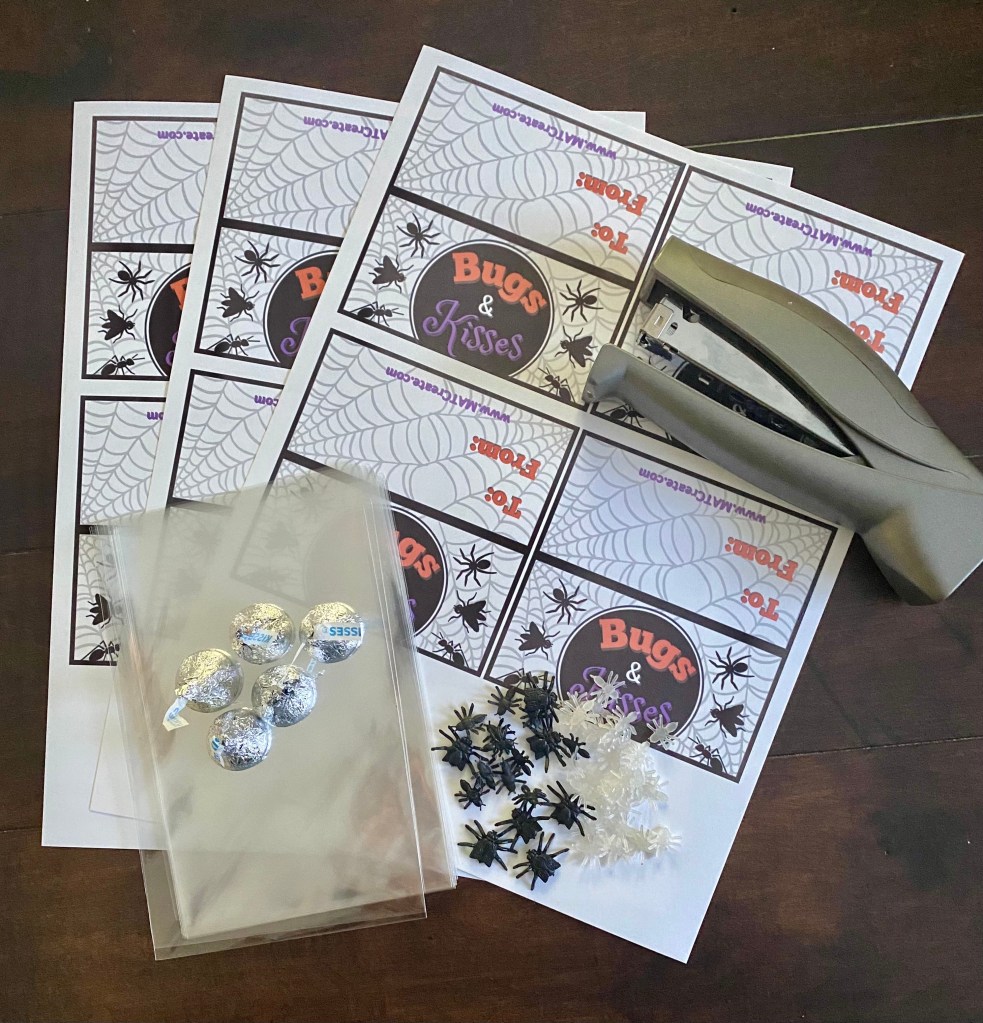
To Create:
1.) Decide how many you want to make (4 per sheet) and then decide what size bags to use. The bigger the bag, the more supplies you will need. My example is 4×6.
2.) Print template.
3.) Cut out templates. Fold in half.
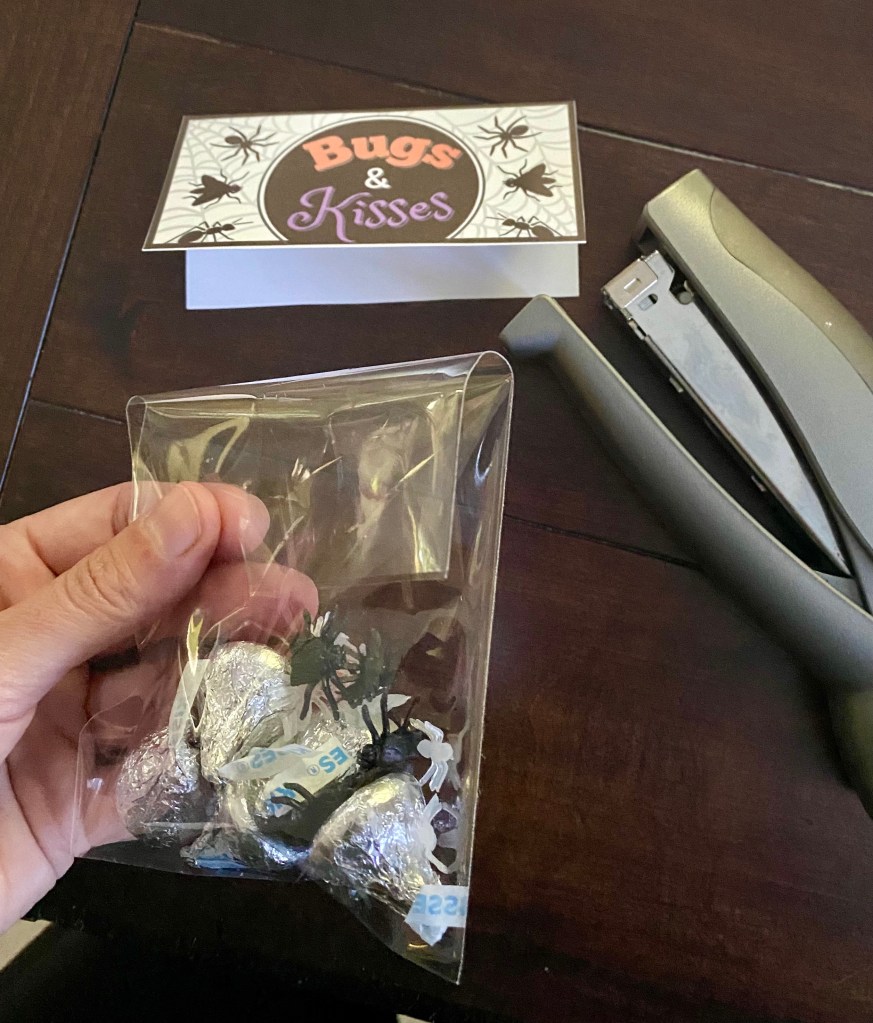
4.) Fill the bags with plastic bugs and Kisses (chocolate Hershey Kisses).
5.) Fold the top of the clear plastic bag down, attach the label on top by stapling (see example).
6.) Address them to recipients and sign who they are from.
The fun part- give to your friends & family!
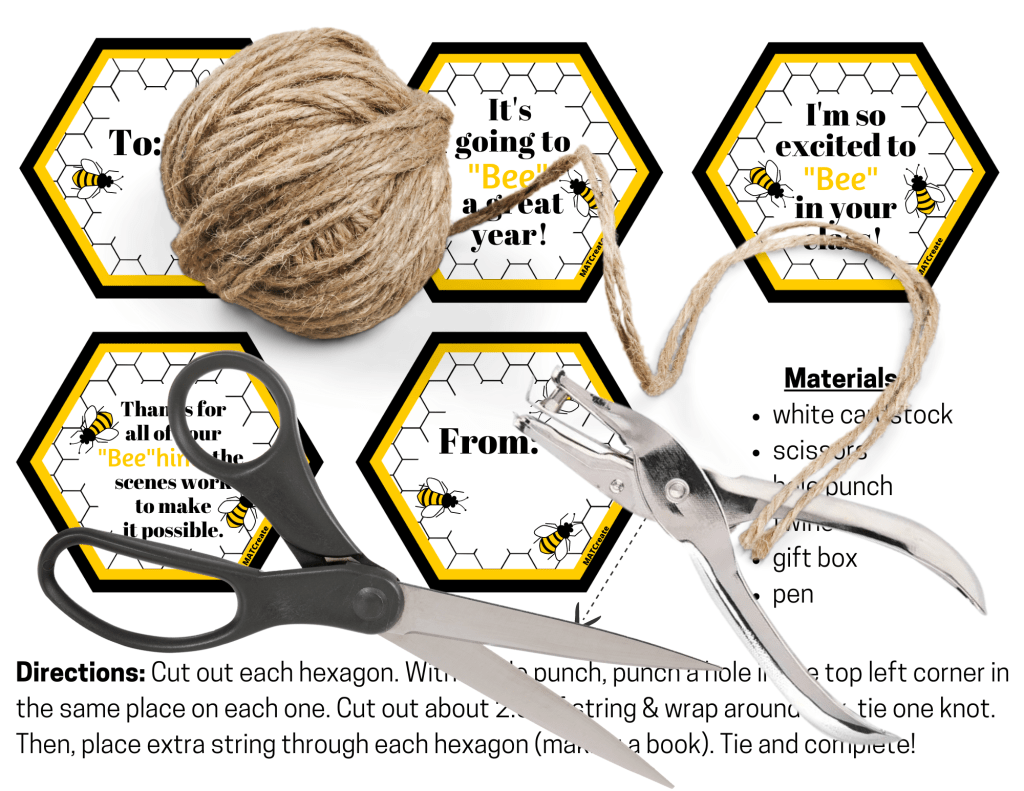
“BEE”GINNING OF THE YEAR TEACHER GIFT

It’s back to school time! Show your child’s teacher you appreciate all of the hard work they have done before school started and in the first few weeks by a little pampering gift. Make a quick and simple gift they can enjoy at home.
Materials:
- White Cardstock
- String (I used twine)
- Scissors
- Burt’s Bees item (can be a Gift kit or chapstick)
- Bee Hives Template
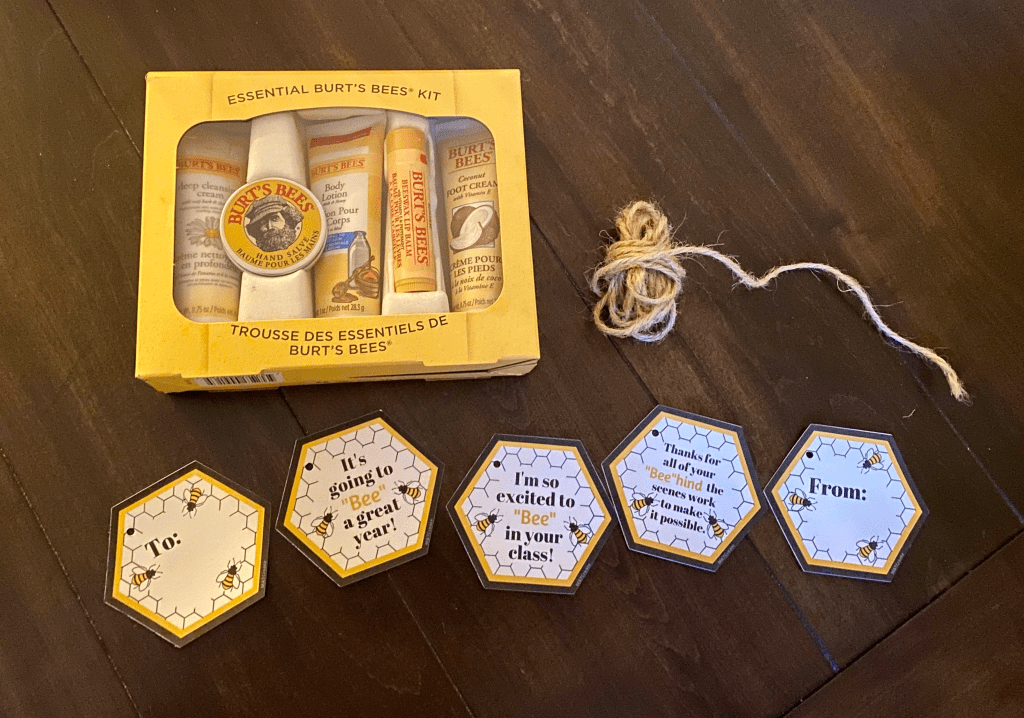
To Make:
1.) Download template from Etsy.
2.) Print on white cardstock paper.
3.) Cut out each individual hexagon.
4.) Using a hole punch, make a hole in the top left corner of each shape at the same place on each one.
5.) Wrap package in twine/string, tie one knot.
6.) Pull the hexagons through the string (starting with last first).
7.) Tie a bow (double knot).
8.) Fill out “To” and “From”.
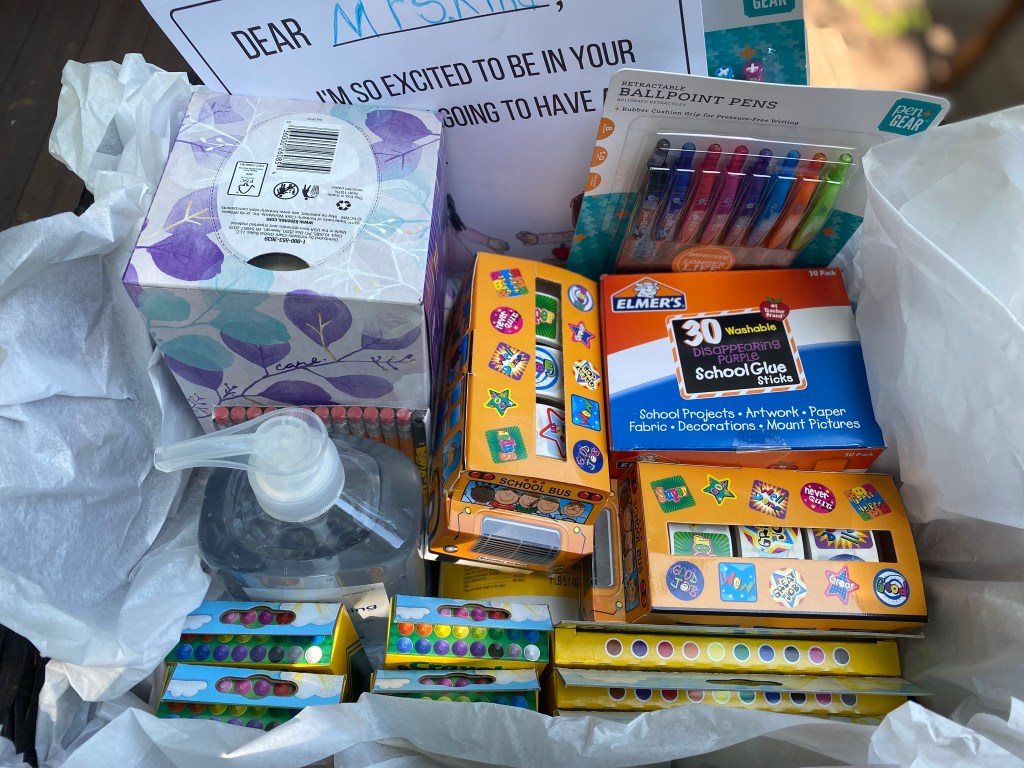
BACK TO SCHOOL TEACHER SUPPLY GIFT

It’s the beginning of the school year already! Teachers work so hard to get ready for the school year. Show them your appreciation by donating a few supplies to their classroom. Believe it or not a lot of teachers use their own money to buy classroom supplies. I know this first hand since I am a former teacher.
Suggested Supplies:
*You can always email your child’s teacher ahead of time and ask what supplies would be useful in the classroom or they might have an Amazon wishlist too.
Cleaners: Clorox wipes, Lysol disinfectant spray, hand sanitizer
For Kids: crayons, markers, glue sticks, scissors, sharpened pencils, kleenex
For Teachers: pens, markers, post-it notes, stickers, colored paper, fun paper clips, dry erase markers, colored chalk, note from child (see below)
*The school bus sticker kit I bought on Amazon here.
To Make:
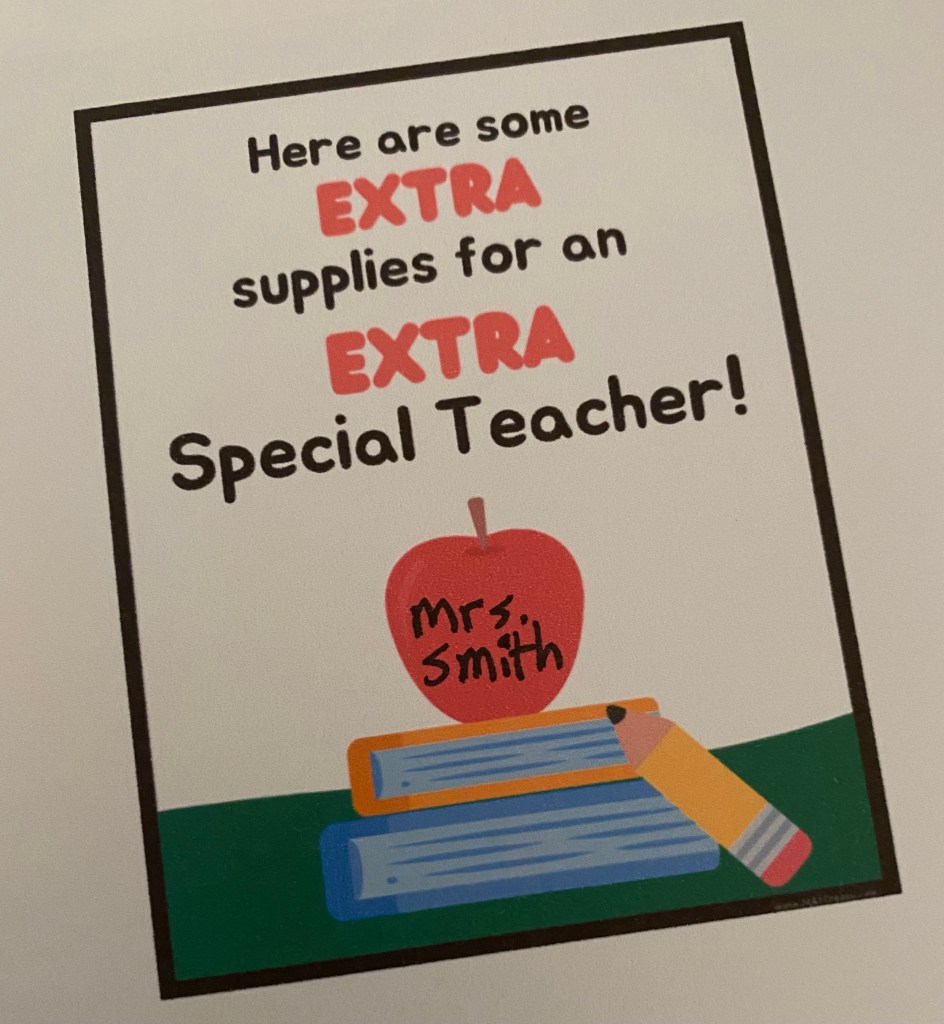
Purchase materials. Place in a bag or basket. Then, print this template, write the teacher’s name inside the apple or on books (like example) and attach.
I like to drop the supplies off before school starts, this way they can use them right away. Any time during the school year this would be appreciated though.
Special Note (from student):
Let your child help celebrate their teacher too. Include a little note or some artwork or both.
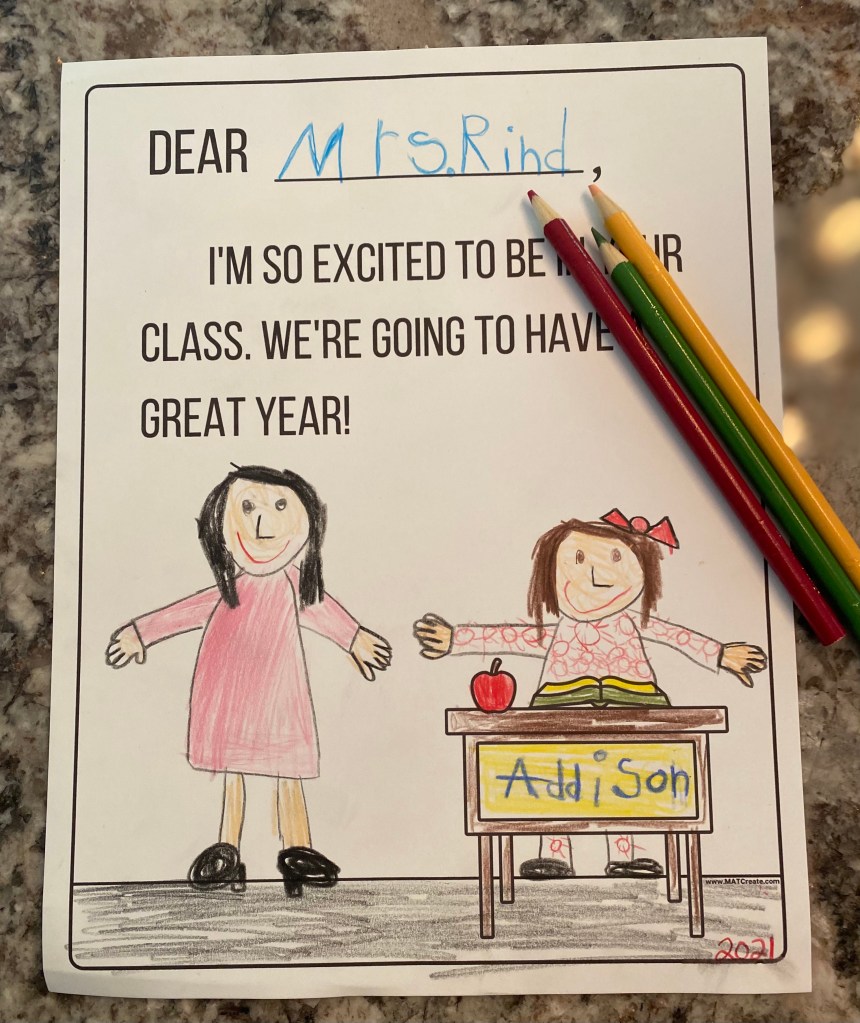
My daughter wanted to make a gift for her teacher. So I created this template. It’s a simple little note, letting her teacher know she’s excited to be in her class along with a self portrait and picture of teacher (them in class). There are two versions- one for younger kids who can’t write as well and the other version is blank, for your child to write their own special message. Make sure to have them write their name on the desk and year somewhere too.
Happy gifting & have a great school year!
*Make sure to tag MATCreate if you make this gift!

M.A.T. Create is a participant in the Amazon Services LLC Associates Program, an affiliate advertising program designed to provide a means for MATCreate to earn small fees at no cost to you by linking Amazon.com and affiliated sites. The small fees are then used for supplies to make more posts.
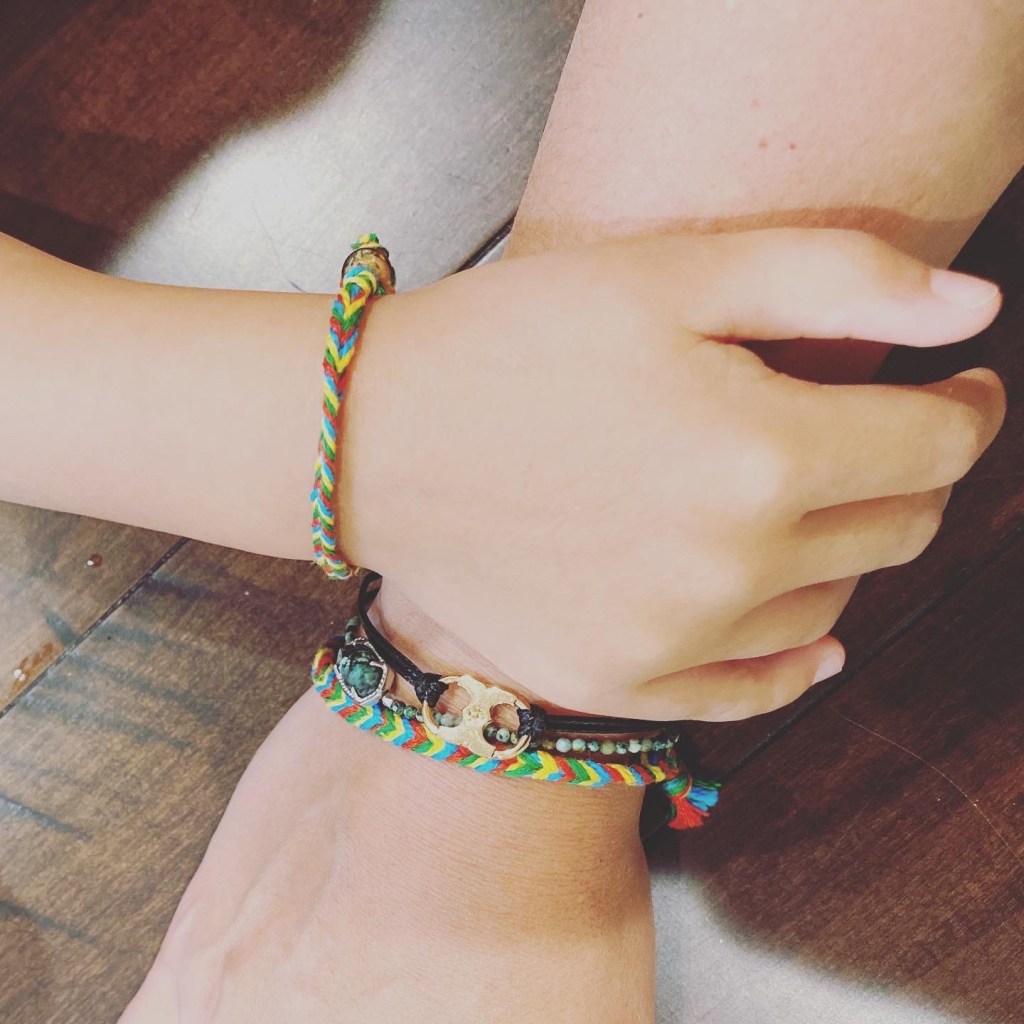
MOMMY & ME BRACELETS

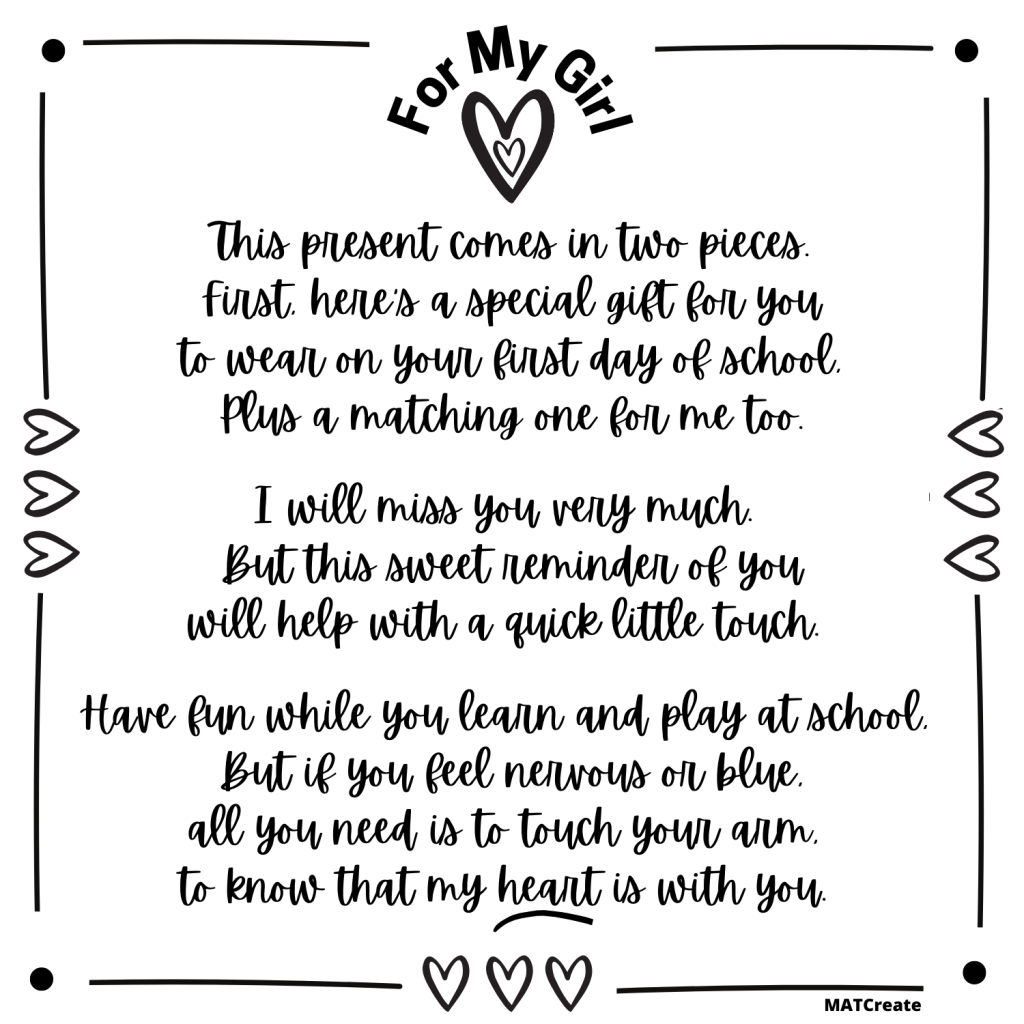
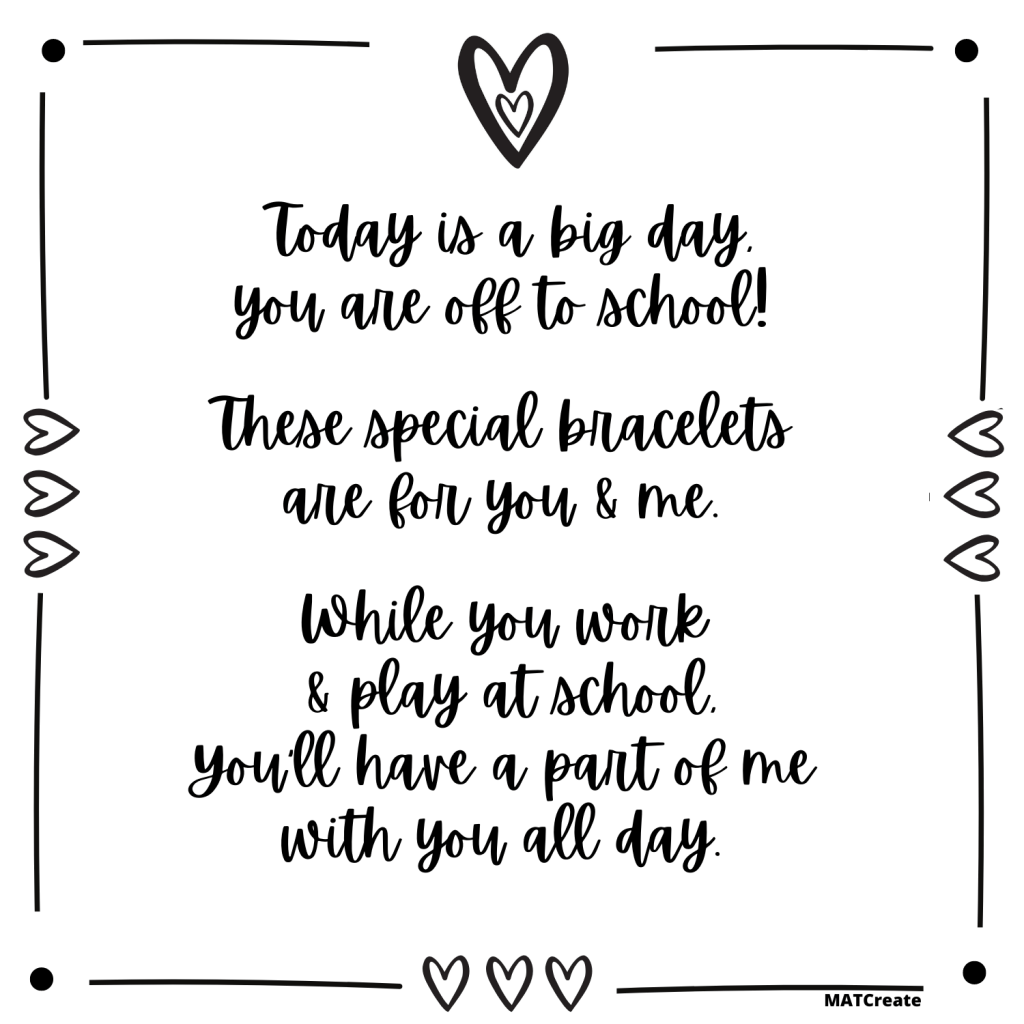
Make a special gift for your daughter or son who is off to school! Something as simple as a bracelet to wear will be a fun surprise!
I was inspired to make these bracelets because of what my mother did when I was a child. When I was in early elementary school my mom would let me wear a piece of her jewelry, usually a bracelet, to remind me of her. I wanted to stay home with her and not go to school. So the solution was that I could take a “piece” of her with me to school. It had a comforting affect on me.
My daughter hasn’t been in school since last March (over 5 months). Since then she has been with me everyday. The transition back to school this year is more difficult due to of COVID. I wanted to make her a small gift for the first day of school to remind her of me and also something she could be excited about.
The night before school I laid the note (see below) and the bracelets out on the kitchen island where she eats breakfast. This way I was sure she would find them. She loved her special bracelet surprise & that I had one to match too. Except she didn’t like that the bracelet wouldn’t answer her questions like I normally would. She pointed that out to me on the car ride to school. I explained to her that she’ll have to wait until after school for that. The bracelet is magical, but not that magical. 🙂
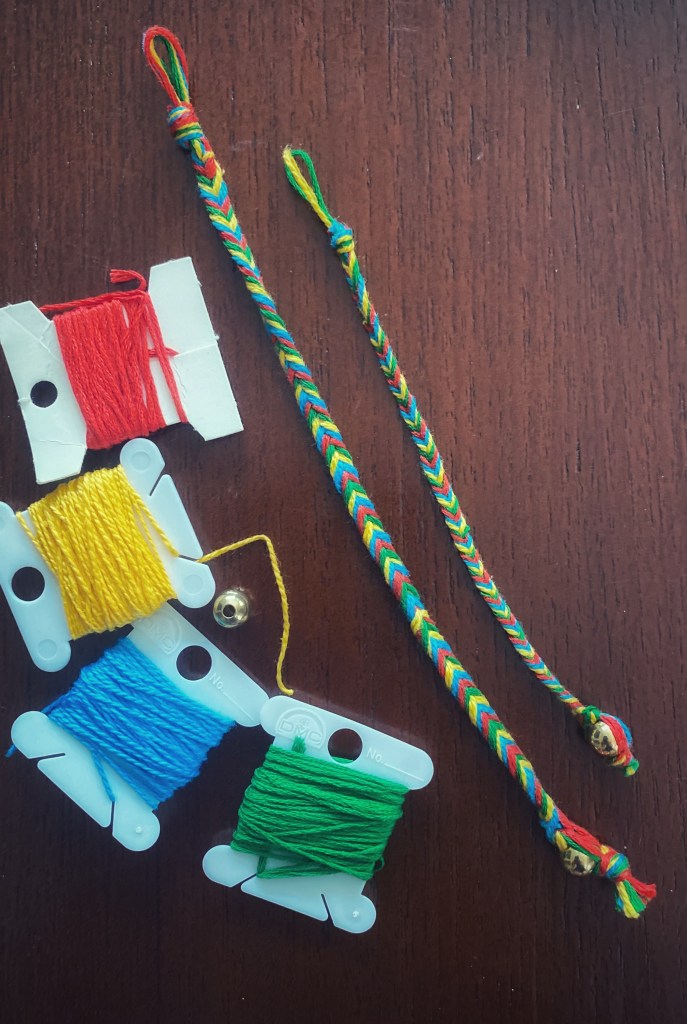
Below is a simple card I made to go along with the bracelets. I made simple fishtail braids out of string for ours. But the possibilities are endless, so many different materials and colors you could use. If you have an older child, it would be even more special to make together. There are lots of tutorials online on how to make different braids. If doing beads, you could review patterns and choose your child’s favorite colors (great fine motor skill practice too).
Materials: (to make one like my example)
- embroidery thread
- clasp (beads or buttons)
- scissors
- card with poem template (click in below)
- cardstock or ink jet paper (white or colored)
- printer
- bracelet templates (3 options)
Another option is to make one for each other, they won’t match (could use the same colors), but special because you each made one!


Happy Creating & Wearing!


